

ACParadise Network:
American Cosplay Paradise
American Cosplay Experience
American Cosplay Snapshots
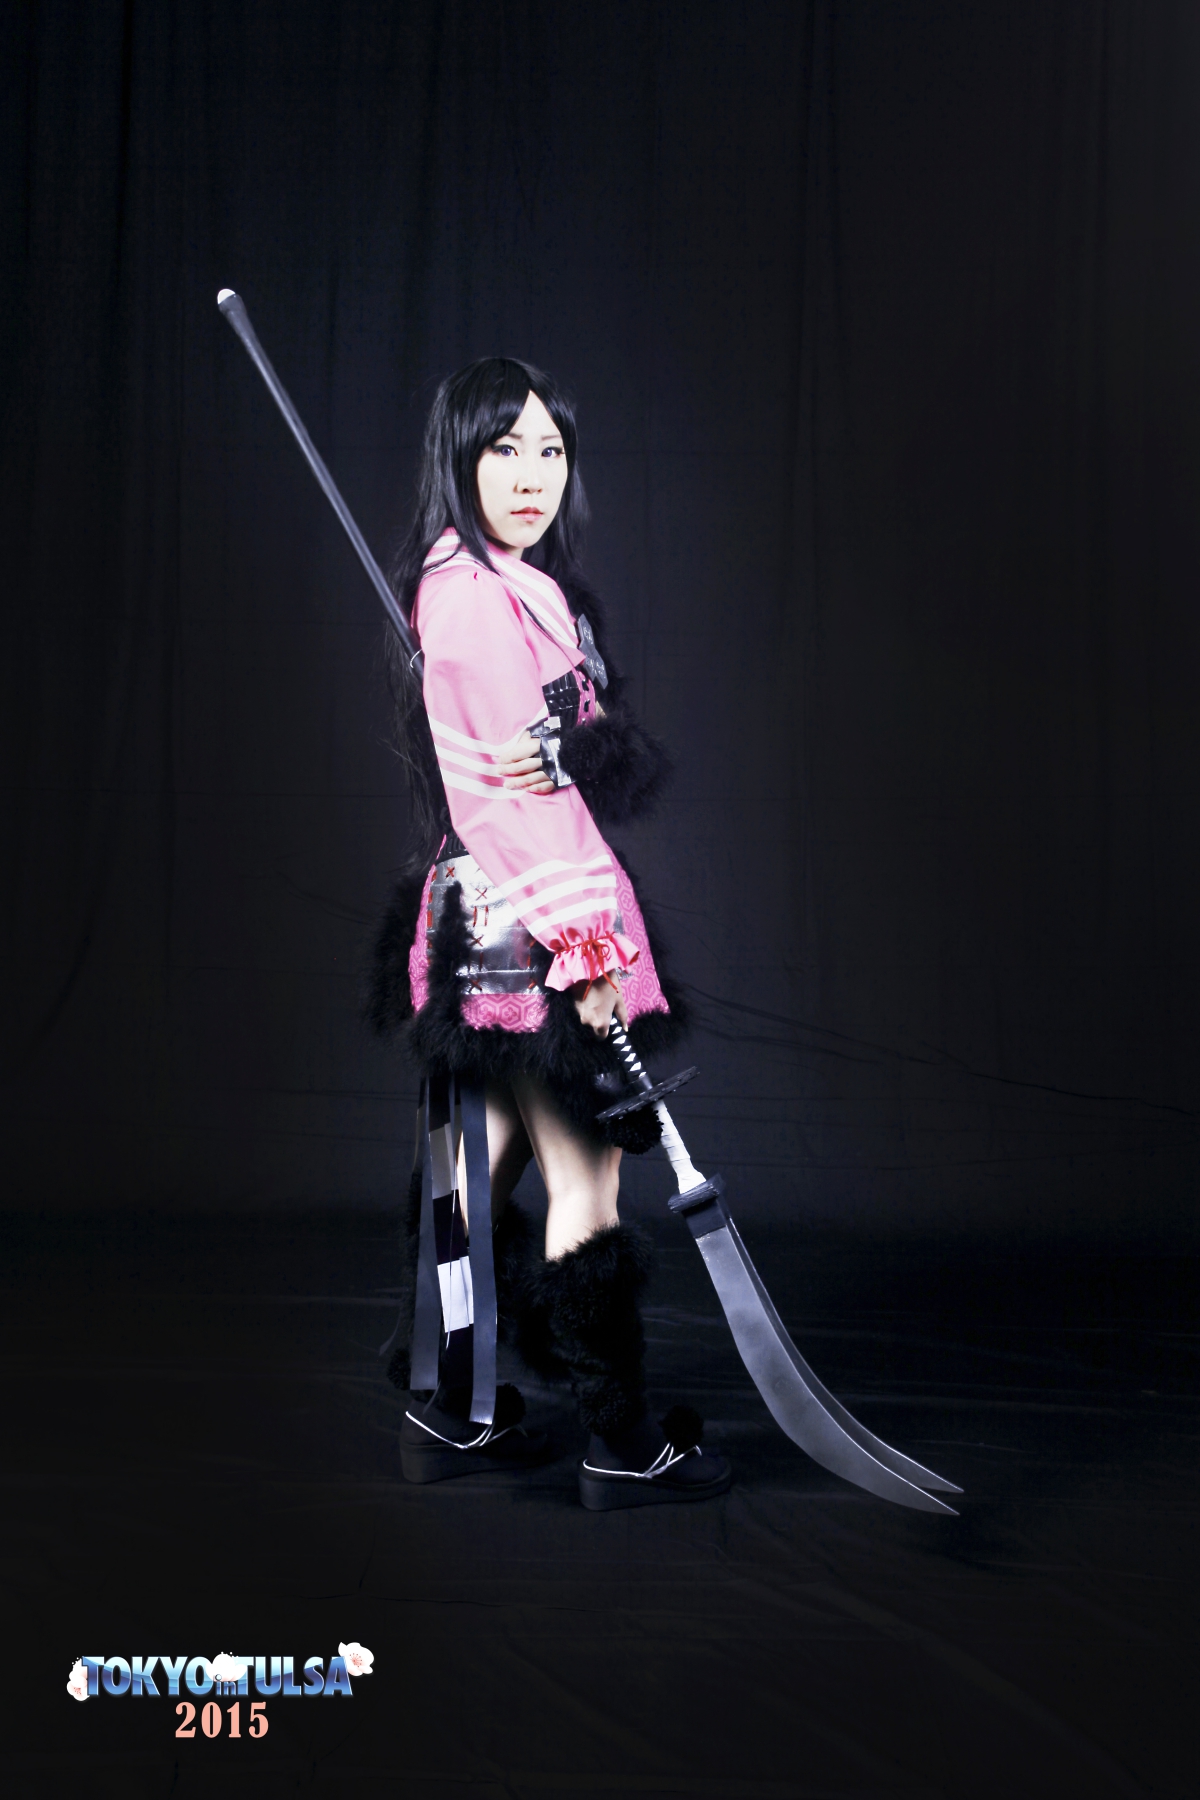
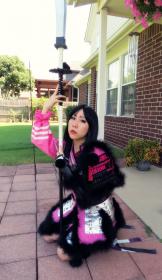
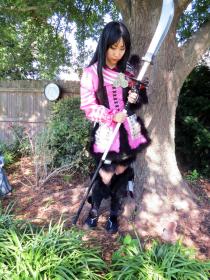
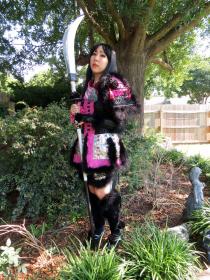
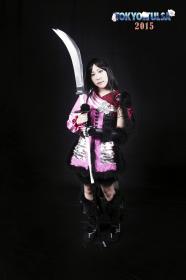
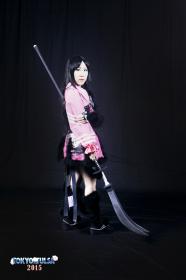
Cosplayer JieKi > Costume of Oichi (Sengoku Basara)
- Most Recent Photo
- 08-17-2015
- Series
- Sengoku Basara
- Character
- Oichi
- Year Completed:
- 2015
- Construction Difficulty:
- Difficult
- Awards
- TnT 2015 - Judges Choice Award
- Costume worn at:
- Tokyo in Tulsa 2015
About this Costume
- Construction Details:
-
This started off as a maybe-dream cosplay because of all the detail work I wanted to put into it... Got bored and decided.... WHY NOT??
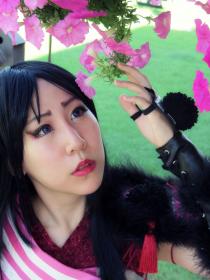
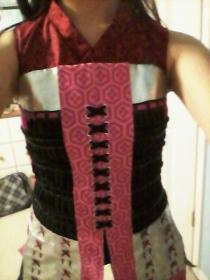
Top/Dress : I patterned this piece out a few times before I cut into this nice, leathery/soft vinyl material. Every edge is either serged or sewn down with a top stitch. The silver "armor" pieces are silver pleather. It's three rectangle pieces sewn together then sewn onto the black piece in a way so that it looks as though it were cascading down. I braided cords from yarn and sewed that onto the top raw edge of vinyl along with above the silver pieces.
For some reason I always wanted to find a pink brocade for the trim, but I could never find the right color! In the end, I realized uniform fabric would probably look better than a shiny satin one. XD All the trim was serged and painted with a hand-made stamp that I made from 5 layers of craft foam and a layer of poster board. It was a tedious process but it was well worth the look!
After sewing the pink trim onto the "leather" dress, I took an x-acto knife and cut lines and weaved flat shoelaces into the dress to give it the look of samurai armor. This was by far the most time consuming process for some reason, probably being that each section was measured off before I cut into the dress. In between each "section of laces, I also sewed in more black yarn braid.
After that whole process, I punched holes into the silver "armor" in order to weave through red cord. I had to punch out tiny holes on the center trim and attached the smallest eyelets I could find. I laced through another black shoelace. I attached a zipper to the back temporarily so that i can also attach the top red piece into the zipper.
For the red yukata top section, I opted for a quilting type fabric with darker red flowers already printed into the fabric. It is sewn onto the main black piece.. The pattern is based off a typical yukata shape (no shoulder seams, back seam) but with a bit more curve so that it actually lays flat on my shoulders. After figuring out where it lay on my body, I hand stitched it to the main dress and to the rest of the zipper. Lastly, I took 2 fur boas and sewed those around the bottom edge. I trimmed some areas down some so that they were more natural/smooth. I also sewed on two buttons on the front and back for the sleeve.
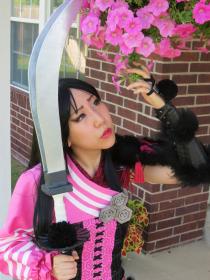
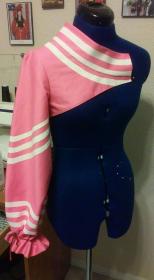
Sleeve: For consistency's sake, I used the same pink fabric from the trim. I patterned the sleeve with a yukata collar that curves a bit at the end (since yukata collars are usually just a straight line) so that it stuck up a bit on by the neck. I cut the sleeve a few inches longer than I needed because I wanted to have a clean edge. Before I sewed the sleeve on, I painted the line designs with two layers of white fabric paint. I folded the edge of the sleeve in and sewed a wide stitch line where the red piece of string/rope was going to be. I scrunched it all up and tied it off so that it poofed properly and so that the red piece didn't actually have to fold the sleeve together. After tying the red piece on, I sewed a few places onto the sleeve to prevent it from coming undone/moving around. After testing it on with the main dress, I sewed on two loops made from white cord that would go around the button. I made sure that the broach piece would be covering up the button from the front.
For the broach at the end of her sleeve, I made it with two layers of craft foam. the center flower pieces were made from a sticky back craft foam for easy glueing. After mod-podging it a few times I spray painted it and weathered it down. I then sewed felt onto the sleeve where the broach would go and glued the broach down.
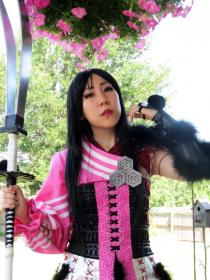
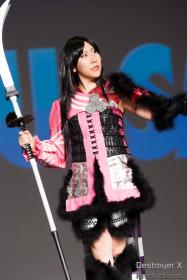
Top/Dress Extra: For the front panel, leg guards (if that's what you can call them), and tail (?) pieces, they are all attached onto an elastic piece that goes under the main dress. The front panel was made with the same techniques as the dress, instead with red yukata fabric instead of black vinyl. The leg guards are silver pleather, cut and laced through, then with fur sewn around the edge. I braided red yarn together and sewed those on the inside of the guards. They are sewn onto the elastic with shoe laces. The tail pieces are made from purple ribbon. I mod-podged both sides to harden it before painting one side with black fabric paint. When that dried I painted on two white rectangles on the underside. I sewed those straight onto the elastic.
Shoulder Armor: This was a strange piece. I made a pattern so that the edge would curve out and in and cut out two pieces of vinyl. For the front I used the same technique as the main dress and cut/laced shoe laces into the piece. I made a pompom out of yarn and stuck that on there, along with a tassle. For the back piece I saw a weird white/red design so I recreated that simply with white fabric and red paint. I sewed that onto the back and made 7 eyelets for red cord to go through; one for the front, back, top, and around my arm. I glued some cardboard inside to hold the shape better. After lacing through the cord, I sewed the two pieces together and then attached another piece of furry boa.
I made the connecting piece out of pleather, pink fabric, and red quilting. I made my own bias tape to go around the edge of the pink. Essentially it's the same techniques as the main dress pieces. I sewed that onto the armor piece after figuring out where it was supposed to go. The piece is held up by a red cord that is looped around the two buttons of the main dress. There is also a hook on the inside collar of the yukata part and pink shoulder piece.
Glove: Made a pattern with duct tape first. I cut out the pieces with the same leathery vinyl as the dress. With another type of vinyl, i made fence-post-like pieces and sewed that onto the glove. I punched out eyelets and then sewed all the pieces together. It laces up like in the game. More furry boas around the edge. For the glove section I made a pattern and sewed on pleather rectangles. I added in some finger loops with shoe laces. Giant pom pom once again.
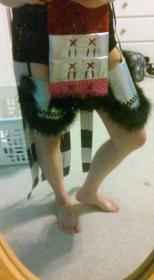
Leg Warmers: Made a pattern with duct tape first. I cut out the pieces with fur. I made some darts at the top so that it wraps around my leg properly. I sewed on clasps at the inner ankle before sewing a marabou fur trim around the top. I made more fence-post pieces and figured out how they would lay on my leg when I wore it and sewed those in. They are held together with silver pleather. I sewed on two pom poms on each piece.
Started with a base wedge flip flop. I painted the sides with fabric paint because it was originally striped blue (haha). I sewed on white cord to mimic the white straps of her shoes. I crossed over two pieces and sewed those together in order to add the yarn pom pom to it. The socks are old tights that I pinned and sewed a weird toe section off.
Naginata: I didn't realize I would make this in the end but here it goes! The base is a paint roller handle and a paint roller stick thing (the best things in the world). The blades are made from hobby wood, spray painted silver. They were glued into a square based with sockets cut out for stability when gluing. A hole was drilled in the rectangle so that it could slide onto the paint roller handle (cut off most of the top). Before gluing that down, I paper-mached the handle and added five layers of craft foam squares to the base to make it more study. After attaching all the pieces I wrapped the blade bases with craft foam. I hot glued everything down once it was all stuck together. I painted the handle.
There is a weird round thing on her weapon which I decided was the good meet up point for the two parts. The base of the round piece is wood with the center cut out. It slides onto the top piece. I embellished with craft foam and paper-mache. The part under the round piece was wrapped in more shoe laces, samurai sword style. For the black parts, I paper-mache/craft foam/spackled bumped up pieces so that it would look like a seperate section. The middle is wrapped with cloth and mod-podged/painted down. - Personal Thoughts:
- Super big maybe cosplay come true LOL.
**SUPER SURPRISED I WON AWARD FOR THIS LIKE WOAH.
Wig Details
- Wig Brand
- Unknown
- Wig Name
- Long Basic w/ Bangs
- Styling Notes
- Old wig parted in the center LOL
Add a Comment
-
 418453 VisitorsAcy's Pick: 05/2018
 -
- Cosplayer Info
- Costumes Worn
- Costumes Made
- Props
- Wigs
- Favorites
- Convention History


Sorry, you must be a registered user of and logged in to view and add comments. Either log in or register now!