

ACParadise Network:
American Cosplay Paradise
American Cosplay Experience
American Cosplay Snapshots
Cosplayer josephiroth > Costume of Sanada Yukimura (Sengoku Basara)
- Most Recent Photo
- 05-06-2013
- Series
- Sengoku Basara
- Character
- Sanada Yukimura
- Special Variation:
- hi res videogame model
- Year Completed:
- 2013
- Construction Difficulty:
- Very Difficult
- Awards
- best overall 2012 otakon
- Costume worn at:
- Otakon 2013
About this Costume
- Construction Details:
-
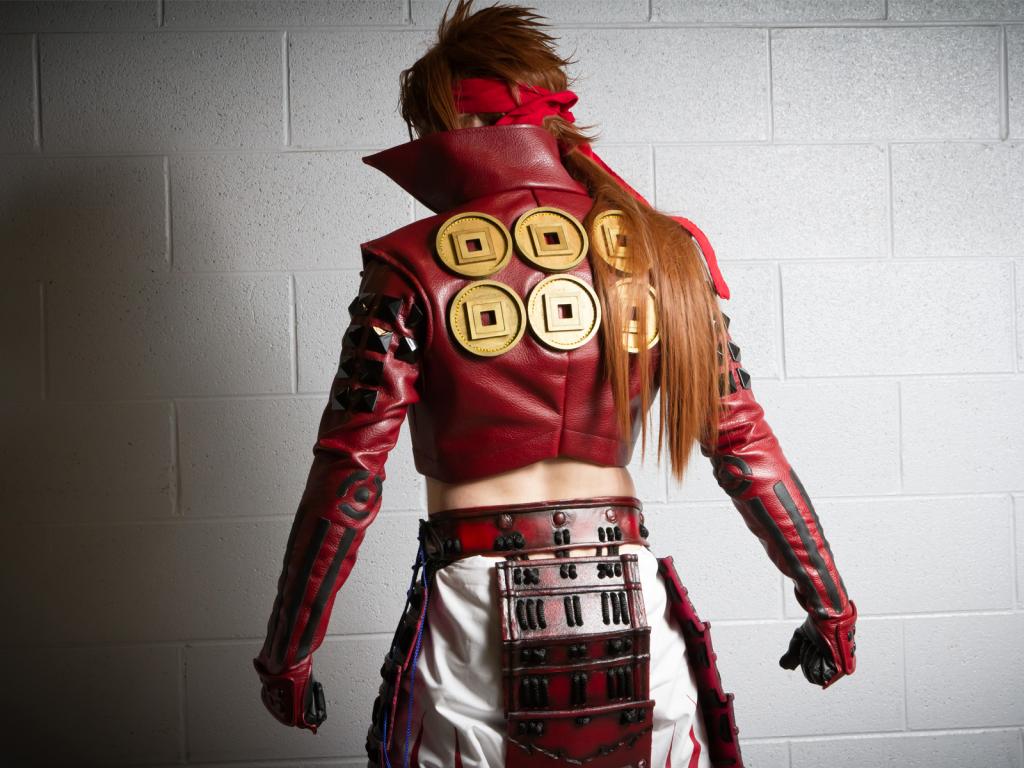
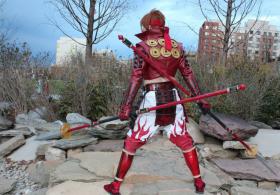
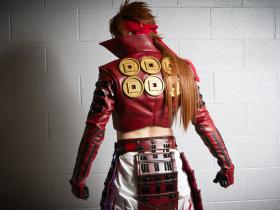
the gloves i made a custom pattern for and are sewn into the underjacket. the black decals on the forearms and elbows are satin stitched on. the jackets are made out of leather and are reenforced with denim underneath so the metal studs wouldnt tear the leather from brushing against someone :p i bades the upper arm stud pattern off of the videogame hi res photo and painted them black before attaching. the outer jacket is lined leather and the rokumonsen on the back i made in 3d *solid works* and laser cut out. each piece because of the detail had to have 100 individual holes drilled around the edge so the piece could be sewn on. the inner squares were also laser cut :)
The wig i sewed a pony tail on to and cut and styled myself.
the bandana hair tie socks , legs bands etc were all super simple little things to make and went fast. the cool thing about the coins *the rokumonsen* around my neck is i had originally made them in 3d and 3d printed them out out of alumide, but i ended up finding original period coins :)so this cosplay is part historic ;)
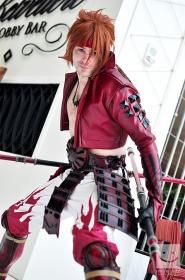
the pants i drew freehand on the pattern i made for the flames and fabric painted them on ever so carefully. The sandals i found a tutorial for and made my own accurate sandals as well ^_^. now comes teh fun stuff ^_^
the leg armor i made out of wonderflex layered 2-3 layers in places. first coat was a matte red then a shiny red, then a brick red for some weathering, a black for more intense weathering, then finally a clear coat. there is a hidden hood system that latches them on to my legs as well. i also learned how to airbrush in this whole process :)
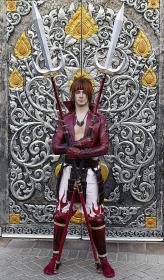
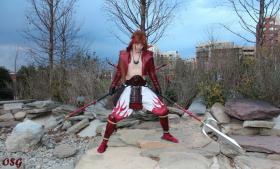
the waist armor i made twice because the first time the paint didnt take and would scrape off the first plastic just by looking at it... so wonderflex again and drilling 500 holes, trimming them, and them sealing them with a soldering iron later... i redid it and it turned out like this. i do have a tutorial for this all on my tumbler at the end of this too. i ended up sinking 500 ft of rope traditionally wrapping the armor pieces together. the painting process was similar but during the black weathering stage i used a stiff bristle paint brush to scrape the black over the red giving it the look of wood grain before the clearcoat.
as you all know con security can be a pain with large weapons to i was faced with that challenge when making the spears. i used metal piping, wood, and wonderflex for it. the metal piping is cut into 4ft or smaller sections that break down with couplings that i machined down to fit under wood turnings on the spear.hand painting the wood turnings too :) the red on the spears was my first coat then i airbrushed white fire all along the poles. i used a clear coat with a drop of red in it to make a see through pink layer over it and make the white look more red gradient then several clear coats followed. the end of the metal poles had a machined down cap that i drilled the end out of. the spear tips are made from wood at the core by a stiffer plastic, then a layer of wonderflex to seal them all together. then a more pretty final visible layer of wonderflex over that. painted for a metal sheen that part was done. all i had to do to finish was the gold guards at the end before the spear tips. so i drew those again in solid works and laser cut them out. i painted them gold and epoxyed them to the spear tips along with the drilled out cap that slid over the end of the base of the spear tips. that lets the tips screw on to the poles that also disassemble in the middle. the other cool thing is that since they seperate in the middle of the pole i can join the two together and duplicate his dual spear end weapon as well. sooo yep ^_^ thats a quick version of what i did. id you have any questions feel free to ask! :) and check out my tutorial on my tumblr below
@ http://animeconnoisseur.tumblr.com/ enjoy! - Personal Thoughts:
- i absolutely love this cosplay. i even managed to find period nearly 300 year old coins to use for the rokumonson :D
Add a Comment


 Upgrade Cosplayer
Sorry, you must be a registered user of and logged in to view and add comments. Either log in or register now!