

ACParadise Network:
American Cosplay Paradise
American Cosplay Experience
American Cosplay Snapshots
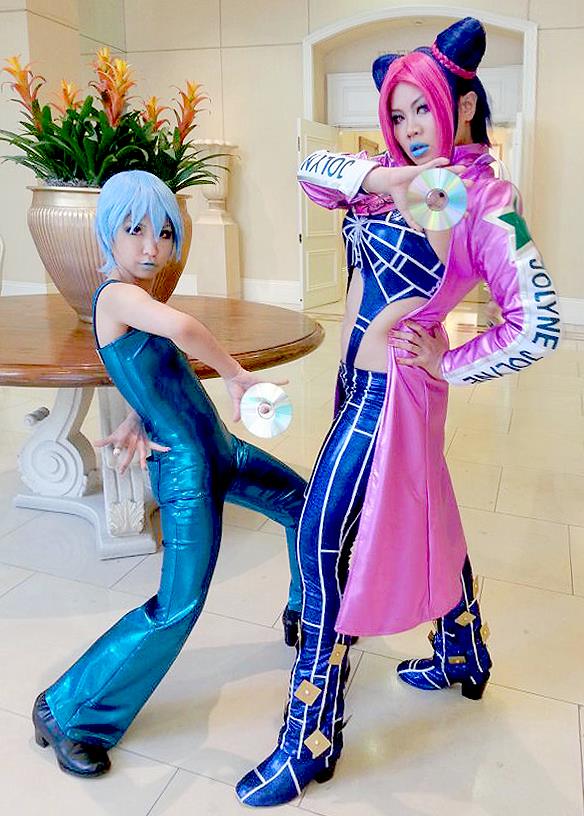
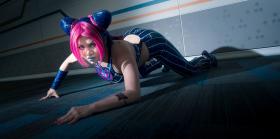
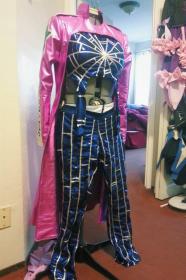
Cosplayer JiaLing > Costume of Jolyne Kujo (Jojo's Bizarre Adventure)
- Most Recent Photo
- 01-01-2016
- Series
- Jojo's Bizarre Adventure
- Character
- Jolyne Kujo
- Special Variation:
- Manga Cover Art / Game Alternate costume edition
- Year Completed:
- 2014
- Construction Difficulty:
- Difficult
- Costume made by
- Chris
About this Costume
- Construction Details:
-
Christopher Decker made most of the costume with my fabric choices and graphic design cut out work.
We went with spandex because I really wanted to be comfortable while still looking good/sleek. We chose Mystique spandex from Spandex world for everything.
The lines were cut thin and sewed down the center onto the costume, zig zag for the top and elastic thread straight stitched onto the pants. Mostly so it would stretch for me to get into it. The top is engineered to hold the straps of a bomb bra down (with my slight edit of making it a racer back for stability). The nature of the suspender design created not as a flattering a silhouette without the added push up.
The body was completely interfaced and lined, upper arms are interfaced at the caps but not the lower to allow movement. Shoulder pads were put in to keep a clean and strong silhouette.
For the designs, the fabric was interfaced with double sided heat transfer interfacing. Graphics were made in Illustrator, printed, traced onto the fabric then cut out. Transferred onto the base coat pattern and stitched down.
Gold squares on the pants were plastic squares cut out with holes punched in the center. Cabochon shirt buttons were glued to the center and they were sprayed gold. Once set they were sewed to the pants with the existing button back loops.
Boot covers were made of similar fabric and technique to the pants, just patterns for the specific boots they were covering.
The chest piece is attached to the shirt via strong velcro. The piece itself is hard plastic wrapped with matching spandex for the base colour. Butterfly design was created in photoshop, printed, hard based and glue to the pink base. - Personal Thoughts:
- Costume : Mostly made by Christopher Decker<br />
Wig + Makeup : Mine<br />
Photography : SpookyElectric<br />
<br />
I love this costume even if the nature of the jacket design isn't always the most flattering, it worked out a lot better than we anticipated. I've love Jolyne since I was in highschool so the resurgence worked out really well for me.<br />
<br />
Also Jojo is the absolute excuse to use the most ridiculous fabric in combination so that was fun.
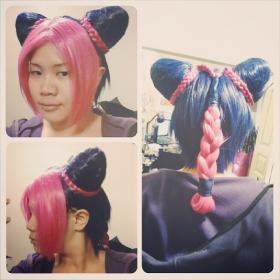
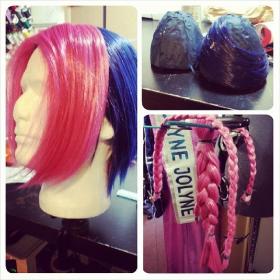
Wig Details
- Wig Brand
- China Cosplay Wigs
- Wig Name
- Charming Long Curly
- Styling Time
- 22 hours
- Wig Quality Rating
- 3 / 5.00
- Styling Notes
- 2 different coloured wigs from China Cosplay, extra long. Pink wig was chopped and fringe sewn to front of blue wig. Blue wig's fringe pushed and tacked down to not interfere with the front. Blue wig was then hacked at the back and trimmed. This leaves us with long wefts for both wigs. 2 polystyrene eggs of specific size are cut down and blue fabric is glued on. Blue wefts are glued and sprayed down. Craft foam base is attached and then buns are hot glue to base wig. Pink wefts are separated into 3 bunches; 1 thick and 2 thin. Thin ones are braided and then wrapped around the bun bases, hot glued in place and joined at the base back. Connecting parts are first sewn then glued for stability. Thick bunch is looped around a pvc pipe, creating bottom loop; and then braided. Base is hot glued, sewn and then hacked. The base is then sewn onto base of thinner braids at the back of the wig. The conjoining part looked pretty ugly, put was covered with fabric matching the costume. The back of the fabric was then sewn down to the wig net to more evenly distribute the weight and not put tension on the bun bases. Fringe was then shaped and cut accordingly.
- Wig Review
- Overall it wasn't a very hard wig, just a very tedious one. Had a 2 year hiatus from working on complex wigs so this was quite a trudge. Some small things could be improved for the fringe framing in future but overall it worked out.<br />
<br />
Note to self : Don't ever try to style this wig in one sitting ever again.
Add a Comment


 Upgrade Cosplayer
Sorry, you must be a registered user of and logged in to view and add comments. Either log in or register now!