

ACParadise Network:
American Cosplay Paradise
American Cosplay Experience
American Cosplay Snapshots
Cosplayer Seifer-sama > Costume of Weiss Schnee (RWBY)
- Most Recent Photo
- 11-10-2018
- Series
- RWBY
- Character
- Weiss Schnee
- Year Completed:
- 2018
- Construction Difficulty:
- Difficult
- Costume worn at:
- FanimeCon 2018
- Sac-Anime Winter 2018
- Sakura-con 2018
About this Costume
- Construction Details:
-
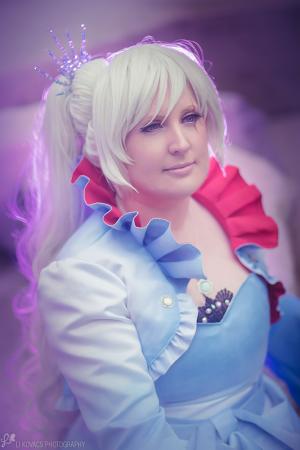
Crown and Jewelry:
nI wanted the entire costume to have a very wintery and icicle look so I decided to reflect that in the bead work. The crown is made out of various bead sizes in blues, purples, and grays. I also added icicle like drop beads to the sleeves since it was in her original concept anyway. The earrings were made with a similar bead pattern as the sleeve beads but with a quartz crystal chunk at the base instead of a glass bead. I know the necklace is supposed to be an apple, but I couldn't pass up using a snowflake and a wintery center bead. I also use similar shapes and beads for her coat buttons.
n
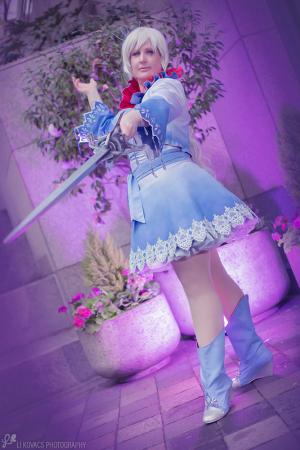
nThe Dress:
nHere comes the hard part.... Dyeing this costume was always going to be the part I was least looking forward to... but it had to be done! I followed R&R Art Group 's Gradient Dye Tutorial. I ended up using Jacquard Textile paint and mixed up three different colors for my gradient. I ended up mixing a ton of paint and at first thought I'd made too much, but then realized I barely had enough after dyeing the last pieces. Once the dye was ready I was able to put the dress together. I created a structure layer and sewed boning channels down each of the seams. I wanted this to be very fitted and very sturdy since there are no straps for the dress. Once it was all together I added the lace using heat n bond and set all my rhinestones in place.
n
nThe Coat:
nOnce the dye process was over this actually came together pretty quickly... well except for the hand embroidery on the sleeves. I did applique for the Schnee snowflake on her back and then added rhinestones on the back. I went back and forth on what to do for the edge of the coat and the collar. Ultimately I ended up ruffling them both and I'm so pleased that I did. Once everything was sewn together I was able to add all my jewelry details. Yays!
n
nPetticoat:
nI built this buggar from scratch as well. I decided to start with something "easy" before I tackle the main costume. I did a lot of research on these super fluffy petticoats and thought this cosplay would be the perfect opportunity to make one. There was a ton of math involved, which was awful, but luckily once you figure it out for one, you just apply it to the other tiers. I decided on three tiers of tulle and organza for the trim. I saw in some shots it looked like there was a slight gradient to Weiss' petticoat so I decided to give this a shot and used white for the first two layers and then silver organza for the top layer. Altogether this petticoat consists of 84 yards worth of tulle strips and another 84 yards worth of organza strips. This thing is huge!
n
nBoots:
nThese started out as a pair of peach wedge shoes. I built a boot cover (and made sure to have the zipper in back) and sewed that onto the shoe. The bead design was a last minute addition but I think it further adds to the icicle theme I'd already started.
n
nBelt:
nProbably the easiest thing on this costume... It's just a belt that attaches in the front and ironed to look like it has a fold in the center like it does in the show.
n
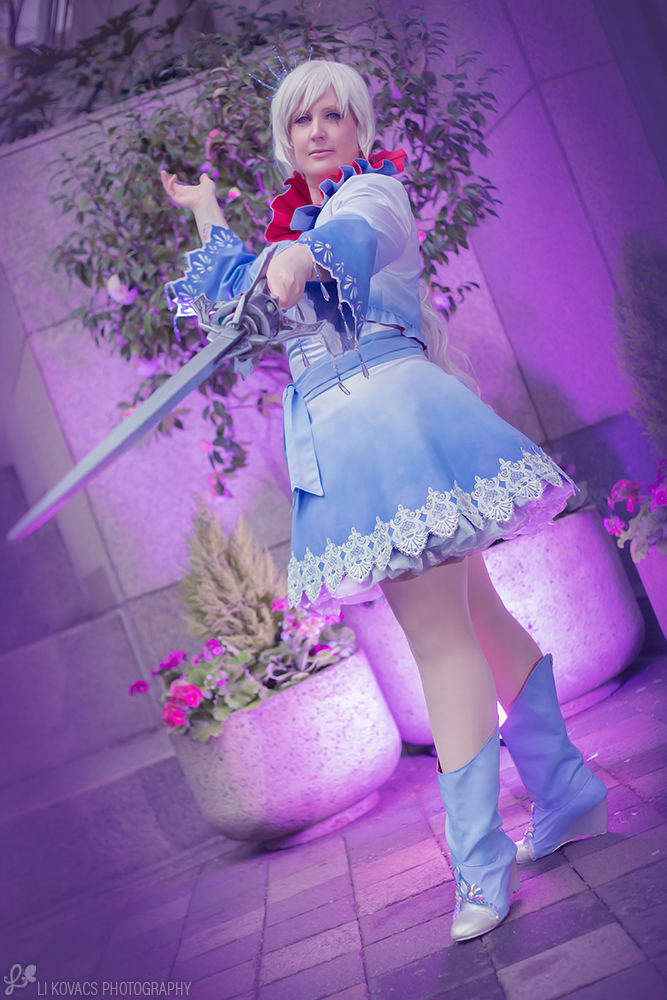
nMyrtenaster:
n
nThis prop... omg this has got to be the most complicated thing I have ever built. I had the brilliant idea to make a version of the sword that spun, and for the most part that wasn't too difficult, it just meant I had to start with the revolver barrel in the center. I started with some basic measurements and then used those to help me figure out how big the dust bullets needed to be. Originally I thought I'd use glow sticks, but that idea died, so I ended up making my own resin mold bullets and filled them with iridescent foil so they'd look magical and catch the light. Once those were set I built the barrel around them out of foam and worbla, placing a ball-bearing on either end. The half dome behind it was made out of foam and worbla as well, I also cut a hole down the center so a dowel could run through the whole sword. I then began constructing the wings and other main pieces while EVZombie tapered the square dowel we purchased for the blade. Putting everything together was a bit of a challenge because I needed to make sure there was enough room for the revolver to spin. It took a few tries but I managed to get something I was happy with. The sword was in three pieces at this point and set together with wood glue to become one solid piece. After everything was dry then I began painting all the filigree designs which took forever.
n
nThe Pouch:
n
nProbably the easiest part of this costume. It started out as a white vinyl that I sewed together and painted silver. The circle design at the center was made with rolled worbla and I added rhinestones to the centers for additional bling. - Personal Thoughts:
- I came to the RWBY community a little late, but it quickly grew on me. I was pretty torn as to who I should cosplay since there were so many characters I loved! I had some friends who were also interested in cosplaying from the series and I had to choose between Yang and Weiss. My first thought was to go with Yang since she's more in my cosplay comfort zone, tomboyish tough chick! But I ultimately decided Weiss because she was unlike anything I'd ever cosplayed before and unlike anything I ever even considered cosplaying. I'll be honest, putting the costume on for the first time was terrifying. I was so afraid it wouldn't be well received or I might not do the character justice... but the exact opposite happened. I've received so much positive feedback for this costume and even from the voice actress herself! It's been a very inspiring journey from the start of this costume to the first wear and I can't wait to wear her again!
Add a Comment
-
 355363 Visitors
 -
- Cosplayer Info
- Costumes Worn
- Costumes Made
- Props
- Wigs
- Favorites
- Videos
- Convention History


Sorry, you must be a registered user of and logged in to view and add comments. Either log in or register now!