

ACParadise Network:
American Cosplay Paradise
American Cosplay Experience
American Cosplay Snapshots
Cosplayer KurohaneShizumi > Costume of Natalia Luzu Kimuelasca Lanvaldear (Tales of the Abyss)
- Most Recent Photo
- 03-30-2013
- Series
- Tales of the Abyss
- Character
- Natalia Luzu Kimuelasca Lanvaldear
- Year Completed:
- 2013
- Construction Difficulty:
- Very Difficult
- Prop made by
- KurohaneRyuu

About this Costume
- Construction Details:
-
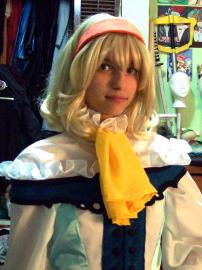
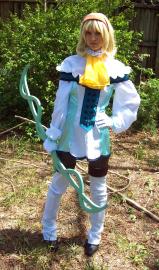
I used my Belgium wig for this costume and made her headband in the same way I make Belgium's as well (cardboard, craft wire, fabric, fabric glue, staples, and hairpins).
Her under shirt is a modified pattern of Simplicity's 4059. The top dress is a VERY heavily modified pattern of Simplicity's 4014; I used two different fabrics for each section needed and added the button-down section in the front that loops around separately with a handmade pattern. It is a very complicated procedure that I really wouldn't recommend to anyone prone to ripping their hair out. Those front buttons do nothing to keep the dress closed, by the way--that's a job for the hooks and eyes I sewed in.
Ruffles for both the neck and shoulders were sewn separate and then on the pieces they are attached to. Front buttons were sewn into front piece before front piece was stitched into place on top dress. All trim happened before final stitch as well. Those circle bits on the front piece? I got appliqué and made a circular pillow onto the piece, hemmed as slowly and neatly as I could, used a white pencil to mark the center hole, hemmed it ahead of time and cut it out.
The gloves and brown tights were bought, not made. Gloves from Gloves Online Inc. on Amazon; tights from We Love Colors.
The cravat is actually just one, rectangular piece of hemmed fabric. I wanted it to be wispy and flowy and I didn't want to make something that would be stressful and complicated to put on. So it is one piece that I tie like a necktie only I don't pull it through, I let it hang freely and it works very well.
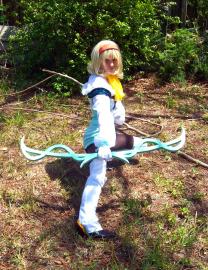
The thigh/boot covers were made with a handmade pattern as well. I put my leg on the fabric, out lined my leg with several inches of space (especially around the thigh area), cut and sewed to fit. For the bottom area that wraps around the foot... I made the back heel portion look like a ∩, but had the bottoms curve into to touch, and I made the front look like a Δ but with a wider top. The back piece has the trim and Velcro is installed on the little leg bits that attach under the arch of the boot. Brown fabric was added at the top.
The bow is her Elfin Bow and was made by my brother, who now does prop commissions and is my personal prop maker. - Personal Thoughts:
- I started this costume many, many months ago and had originally planned to debut it at ShadoCon, but many personal issues came up for me, and I was unable to.
As such, this costume--and its match with my brother (Luke)--are dedicated to my dad.
Wig Details
- Styling Notes
- The body was cut much shorter and the bangs were given a bit more volume.
- Wig Review
- Not a particularly bad wig, but I don't wear it the way I should because the part is not down the center, as was pictured to me when I bought it--bit troublesome, but not horrible.
Add a Comment


 Upgrade Cosplayer
Sorry, you must be a registered user of and logged in to view and add comments. Either log in or register now!