

ACParadise Network:
American Cosplay Paradise
American Cosplay Experience
American Cosplay Snapshots
Cosplayer NiGHTmaren > Costume of Princess Kraehe (Princess Tutu)
- Most Recent Photo
- 11-10-2014
- Series
- Princess Tutu
- Character
- Princess Kraehe
- Special Variation:
- Odile
- Year Completed:
- 2011
- Construction Difficulty:
- Difficult
- Awards
- Best in Show at Megacon 2012
- Costume worn at:
- Anime Weekend Atlanta 2011
- Katsucon 2014
- MegaCon 2012
- Otakon 2012
About this Costume
- Construction Details:
-
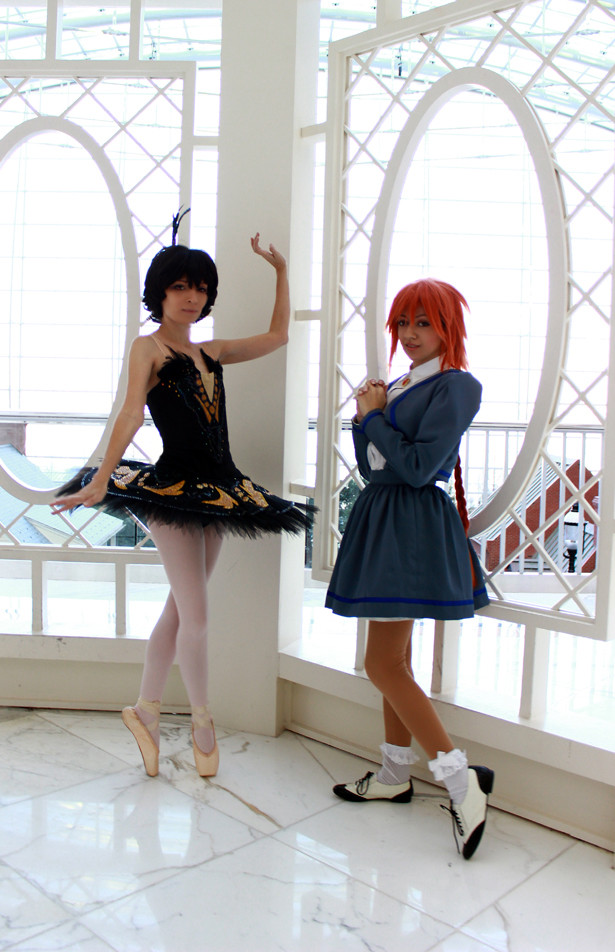
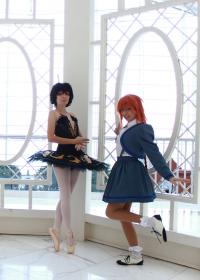
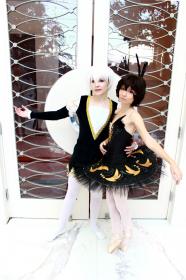
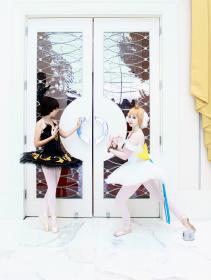
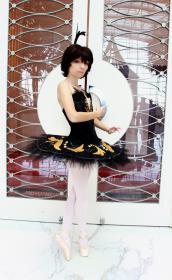
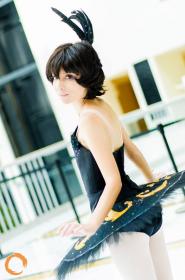
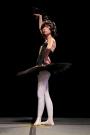
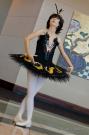
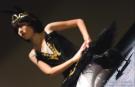
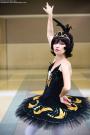
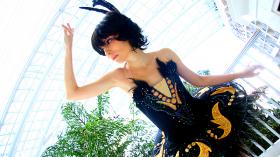
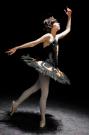
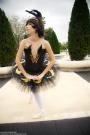
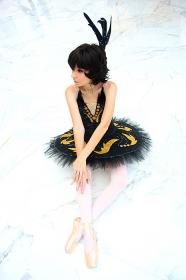
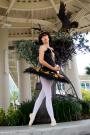
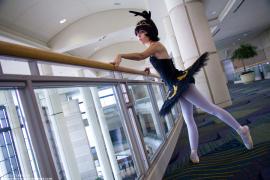
Completed Sept 2011 This costume involved just as much research as it took time and patience to make! Since this is the Odile tutu that Rue/Kraehe wears in one piece of artwork, I decided to make it accurate to the source, the professional stage ballet and Swan Lake. Basically, I wanted to bring Kraehe to life in the role that she was inspired by - Odile. I read up on classical tutus online, as well as invested in a book on their construction and used patterns specifically designed for making one. Sometimes I felt like I was biting off more than I could chew because of the amount of time and skill it takes to make one of these!
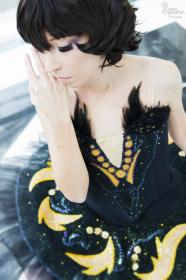
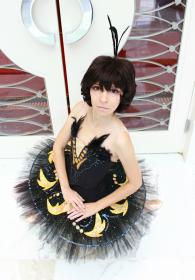
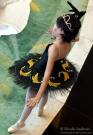
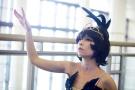
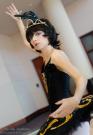
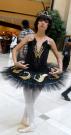
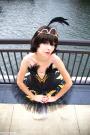
Old tutu: The frill tutu is made out of a stiff (and scratchy might I add!) diamond net that is specifically produced for making a Russian classical 'pancake' tutu, the type that sticks straight out that you see in staged ballet productions such as Swan Lake. A total of 90 yards of netting went into the tutu and the tutu 'butt' ruffles - (13 purchased yards, but when cut into vertical strips of varying widths to make up the rows it all ended up at around 90(. The frills are sewn onto a custom-made Powernet panty (also referred to as the lower basque) and is secured in the back with hooks and eyes. The seat of the panty is decorated with frills made out of net, and pleated the same way as the tutu frills but sewn in half to 'fluff up' and then sewn directly to the panty. The actual tutu frills measure approximately 13" long at the longest layer, which is the topmost layer, and there are 9 layers total. The shortest layer on the bottom is only 2 inches wide. 13" is the customary length for Odile and Odette in Swan Lake, as well. Each layer was meticulously hand-pleated - each pleat is 1/4" wide, and are stacked halfway on top of each other, with the exception of the topmost layer which are 1" wide each and double or triple-stacked directly on top of each other. The tutu layers are all 'dagged' (cut into a 'V' shape), which makes the edge of the tutu appear feathered. I was pretty harsh with the dagging to get them as feathery as I could, so they are more feathery than most classical tutus, but it adds an extra something to this costume and besides, it's supposed to be very feathery! :) The tutu is hooped on the seventh row, which helps to keep everything flatter and gives a support, which is necessary considering the amount of beads on the plate. The hooping is double spiral steel boning split down the center to take out one of the spirals, then painted black and slipped into the casing that was sewn to the seventh row before I did any pleating to it. I steamed and tacked the living mercy out of the tutu once it was all assembled. The tacking was all done by hand with an embroidery needle and buttoncraft thread, through the various rows so they would all stick together and flatten the tutu out. It was very tedious work but necessary to achieve the flat, almost paper thin look. The tutu plate is glitter tulle, to give it some added decoration and because I was really inspired by some existing Odile ballet costumes that used this method. It also makes for a very light-weight plate, which means less of a chance of droop now or in the future. The glitter tulle has a green iridescence to it, much like a crow's feathers, so I was also drawn to it for this reason. The golden feathers were first appliqued then completely beaded onto the plate individually by hand. I also beaded with iridescent black beads and sequins for an even more detailed look.
The bodice was made using a fabric called bengaline with a slight sheen to it, this fabric is commonly used for making tutu bodices. It is fully lined with coutil and spiral steel boning was placed into channels sewn into the seam allowances. It closes in the back with hooks and eyes. The placement of the beads was also done keeping authentic tutu costumes in mind, to avoid snagging on anything, beads and other decorations are traditionally only placed on the front. I wanted to get really crazy with it, but I still think it's well-decorated enough as it is. Most of the beading was actually done on a separate overlay of glitter tulle which was then hand-sewn to the bodice - thus, it's removable, like many decorative overlays are on real tutu bodices to make them interchangeable for other productions. I used feather hackles to do the feather accents along the top, and the center "V" overlay is nude fabric. Again, this was a matter of taste and keeping the costume authentic, plunging gaps down the front of a bodice would be asking for a wardrobe malfunction on any dancer.
The basque (also referred to as the upper basque) is made out of the same fabric as the bodice, bengaline, and is the central support of the tutu. It is sewn directly over the lower basque (panty) and features a corded edge to add a nice finish. The lower edge of the bodice is attached to the upper basque on the interior with heavy duty elastics, which allows for a free range of movement without the bodice and basque becoming separated. The basque also attaches in the back with hooks and eyes.
Old shoes: The pointe shoes I used for this costume aren't fully functional pointe shoes that a dancer would use in a stage production, but rather demi-pointe shoes that dancers sometimes wear to get a feel for pointe shoes before they are ready to start using them. They lack the stiff shank strip on the bottom that allows a dancer to go up on her toes, which also makes the shoe more flexible, comfortable, and all around a better choice for me since I have never taken a lesson of dance in my life and pointe shoes on someone who has never worn them before can be dangerous and at the very least extremely painful. I highly recommend demi-pointe to non-trained dancers who want to do Princess Tutu cosplay, they have the same look, minus the pain and danger, plus they are impossible to go en pointe in, so that limits any risk or temptation to try to do so! The tights are white dancers tights, and I also wear toe covers so my toes aren't too irritated by the box on the demi-pointe shoe.
New shoes: In 2014, I chose to get real pointe shoes for my costume. I picked out Sansha Etudes, since I really like the design, know the sizing for the brand, and like the broader box and square platform. The shoes were broken in in advance, I shortened the shank to suit my arch, and bent it to my liking. I softened up the box by hand and broke the shoes in before wearing them around the con. I elected to use elastics along with ribbons for the extra support. I also use lamb's wool toe pads to keep everything nice and comfy. :) It's important to break your shoes in if you intend to use real pointes, otherwise they will be FAR too stiff and uncomfortable and you will be miserable. :/ You don't want that!
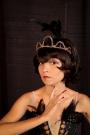
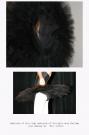
The tiara is constructed of hand-strung Swarovski rose montee crystals and the red gems were also added on. They are hand-wired to a custom made frame of sturdier wire.
The feather decoration in the wig is made of rooster feathers - same type as used on the bodice. I chose these feathers for their look, iridescence, and how well they stick up without appearing TOO stiff. I added some sequins to the feathers because I couldn't resist.
All in all this costume was a labor of love that honestly took around 100 hours, maybe more, altogether. I never thought I'd be able to create a classical tutu of my own so I really surprised myself with this one! - Personal Thoughts:
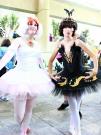
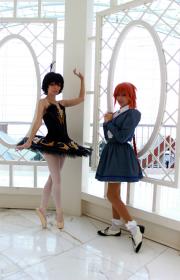
- Princess Tutu is such a beautiful anime, and I knew before even finishing watching it that Princess Kraehe is a character I MUST cosplay. I relate to her much more-so than Ahiru/Tutu, plus I think the resemblance and character embodiment is more my style. I always loved her Odile tutu, so it wasn't hard to decide which of her many outfits I wanted to make. I also have a love for the arts, and the ballet is no exception. I did a lot of research on the ballet (particularly Swan Lake) and the classical, pancake style of tutu for this costume, because I wanted a blend of creativity, accuracy, and accuracy to the source - ballet. I know I went very detailed on construction, in hopes that I am helping someone who wants to make a classical tutu. Any specific questions please do not hestitate to message me! :) Also, this costume is...not quite done yet.
Add a Comment
Photos
-
Photo 1
 0
0  620
620 -
Photo 2
 0 618
0 618 -
Photo 3
 0 555
0 555 -
Photo 4
 0 643
0 643 -
Photo 5
 1 800
1 800 -
Photo 6
 0 854
0 854 -
Photo 7
 2 934
2 934 -
Photo 8
 0 498
0 498 -
Photo 9
 0 601
0 601 -
Photo 10
 0 1031
 -
Photo 11
 0 966
0 966 -
Photo 12
 2 961
2 961 -
Photo 13
 0 666
0 666 -
Photo 14
 0 694
0 694 -
Photo 15
 0 550
0 550 -
Photo 16
 0 809
0 809 -
Photo 17
 0 946
0 946 -
Photo 18
 0 702
0 702 -
Photo 19
 0 627
0 627 -
Photo 20
 0 763
0 763 -
Photo 21
 0 449
0 449 -
Photo 22
 0 827
0 827 -
Photo 23
 1 899
1 899 -
Photo 24
 0 649
0 649 -
Photo 25
 2 639
2 639 -
Photo 26
 0 967
0 967 -
Photo 27
 0 818
0 818 -
Photo 28
 0 715
0 715 -
Photo 29
 1 662
1 662 -
Photo 30
 0 819
0 819 -
Photo 31
 0 1110
 -
Photo 32
 0 809
0 809 -
Photo 33
 2 496
2 496
-
 1742255 VisitorsAcy's Pick: 08/2014
 -
- Cosplayer Info
- Costumes Worn
- Costumes Made
- Props
- Wigs
- Favorites
- Videos
- Convention History


Sorry, you must be a registered user of and logged in to view and add comments. Either log in or register now!