

ACParadise Network:
American Cosplay Paradise
American Cosplay Experience
American Cosplay Snapshots
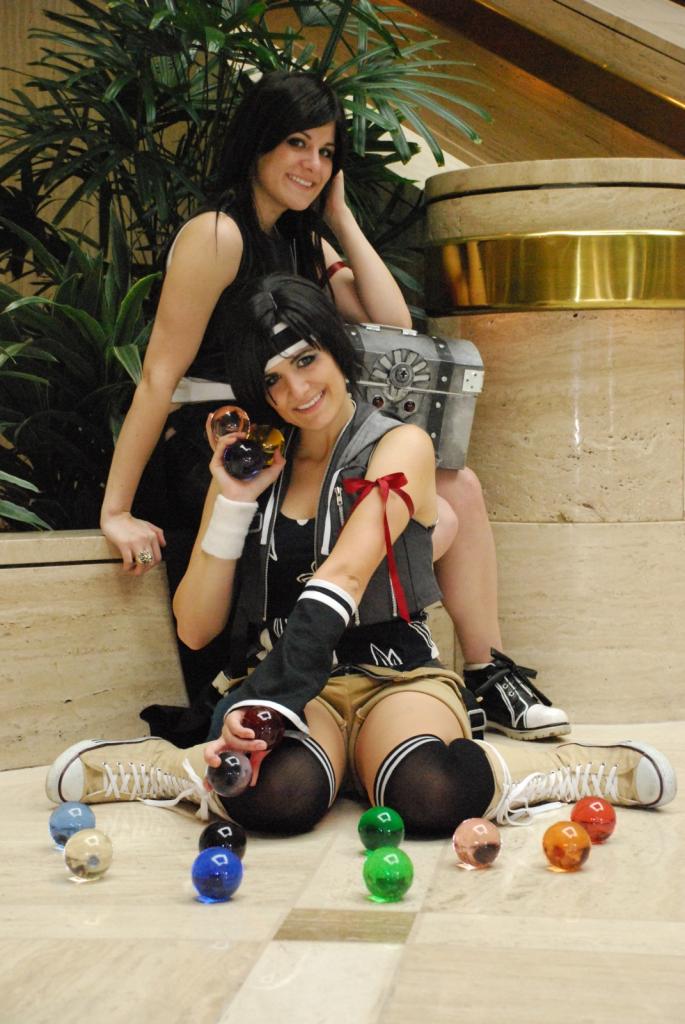
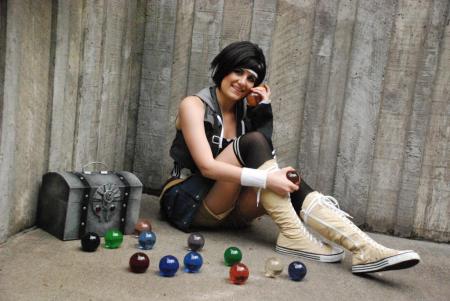
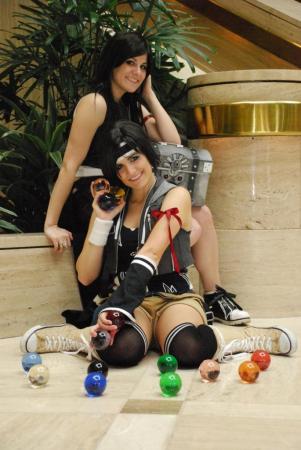
Cosplayer raNar > Costume of Yuffie Kisaragi (Final Fantasy VII: Advent Children)
- Most Recent Photo
- 04-09-2010
- Series
- Final Fantasy VII: Advent Children
- Character
- Yuffie Kisaragi
- Year Completed:
- N/A
- Construction Difficulty:
- Easy
- Costume worn at:
- Anime Weekend Atlanta 2009
- Sakura-con 2009
About this Costume
- Construction Details:
-
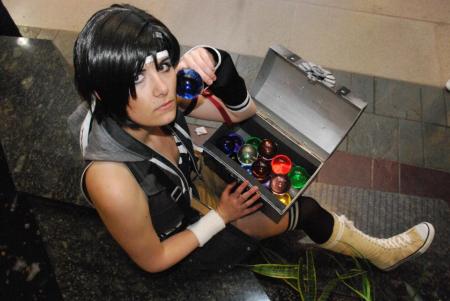
Despite the fact that I've always been more about making my costumes more about how they fit my body, so they look the best they can on me, I decided I'd try to keep this costume as accurate as possible. The wig: was an easy find after searching a while on ebay. I had to do a TON of cutting, layering, wefting in the back, and OMG thinning in the front of the wig, but it's really the first wig I haven't really styled all too much. The back of the wig was wefted, but the front was SO thick I had to go in and thin it. I'm not completely satisfied with the way the wig fall, but I'm loving the super side part like her's, so I'm not complaining too much. The headband: was so simple, but I love it. The trimming on the edge was modified bias tape. I have the smallest forehead in the world so I had to make the tape thin enough for my head, but thicker on the ends. SOOOOO much trimming..... the headband's 90 inches long! oO;; The jacket: was one of the most fun thing I made on the costume! The zippers were all custom sized and stopped. I also made my first piping for this costume. Even though the reference pictures didn't show it, I lined the jacket and added decorative stitching to the pocket so it would match the shorts. I made sure to have anything with superb craftsmanship, so I did a ton of hand-sewing... which is my least favorite thing in the world. I love the way everything looks on the jacket. The belt on the vest matched the one on the pants. I gave them a used/worn feel. She's a ninja afterall. The undershirt was one of the hardest things about the costume, honestly. I only had one instance of Yuffie's jacket lifting of her shoulder to show her undershirt, and to me it looked like a spaghetti strap top. However after logically thinking about it, the cut of her jacket proved it was more of a racerback top; which is cute in my opinion, because of how open her armholes are and the fact her undershirt doesn't show through the sleeves. (way to complicated) I decided to mark the general designs with tailors chalk, and then careful paint on the details with fabric paint. Took forever, and looks okay. The fabric was a pain to paint on. I used a soft paintable fabric paint called Tulip soft matte in white. I mean that took forever. The sleeves: were also simple. Terry cloth for the right wristband, and the left was made of the same fabric as the headband and bias tape was added for the white detail so it would match. I wanted it to stay up on my arm so I hand sewed elastic on the top of the left sleeve, so it wouldn't have a chance to slip down. I'm a craftsmanship freak and lined even the sleeves. Kept me a little warmer, so I'm happy. The shorts: were a nightmare, almost. I found an illustration art on a website that proved my idea that the shorts and the "waist cinched" thing, and were the same piece. It was SO annoying to figure out a pattern of that, and I thought many times about making them two separate pieces. Did I ever mention how unproportional my butt to waist ratio is? All I can say is these things were a PAIN to figure out. I'll probably remake them seeing they were a bit lose on my and the zipper needed to be longer... I stopped it too short. The belt: was fun. I'd never worked with denim material before, and all the detail stitching was fun! It was simple to make, but I added a lot of details with topstitching and snapy-looking-metal-details. I love it! I added a cute buckle, because you don't actually see the buckle, so I took some creative liberty there. The socks: were bought and altered... I now love socks. @o@ SockDreams has the best socks. The shoes: were bought from Refuse to be Usual and painted them with soft paintable fabric paint. PAIN but WORTH IT! I did SO much researching on how to color them before I did them. I didn't want to use normal fabric paint, because I was afraid that would make the fabric too stiff, and I couldn't dye them, because the rubber would get tinted. I wound up choosing to use DecoArt SoSoft fabric paint. I used a 2:1 ratio mixture of Antique Mum and Buttermilk to get the right color I wanted, and then painted away. I took a few nights of painted on and off so the paint could dry, but it came out fairly well. I colored the top red stripe black, and then laced them up. (Which I NEVER want to do again) The ribbon: .... was a ribbon. XD I bought it and so I wouldn't have the problem of it slipping down I used sock glue to glue it to my arm. Worked like a charm too! That was pretty much the whole construction of the costume. I also made a Materia Box (Which I KNOW is not accurate, but I'm happy with it) and materia. I get a ton of questions about the materia. They are casted from polyester resin. ----- As much as I love how everything was made for the costume, I honestly hate the way it looks on me. I think if I was 15 pounds thinner maybe I'd be satisfied completely. Working on it. I wish I had a little cuter of a face. Should practice some make-up skills.
- Personal Thoughts:
- Some good firsts on this costume! I love learning!
Add a Comment
-
 186641 Visitors
 -
- Cosplayer Info
- Costumes Worn
- Costumes Made
- Props
- Wigs
- Favorites
- Videos
- Convention History


Sorry, you must be a registered user of and logged in to view and add comments. Either log in or register now!