

ACParadise Network:
American Cosplay Paradise
American Cosplay Experience
American Cosplay Snapshots
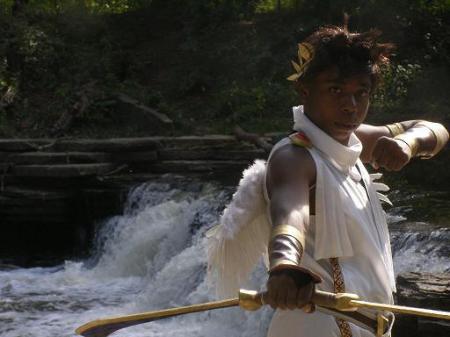
Cosplayer princemercury1 > Costume of Pit (Super Smash Bros. Brawl)
- Most Recent Photo
- N/A
- Series
- Super Smash Bros. Brawl
- Character
- Pit
- Year Completed:
- N/A
- Construction Difficulty:
- N/A

About this Costume
- Construction Details:
-
Leg bracers: First I started off with the basic pair of flip flops I bought at Wal-mart for $5.00 (when it was still summer time), then I hot glue some Cream color cotton fabric (over interface) to the top of the flip flop. Using some left over Brown pleather fabric I then sandwich the two pieces together on my leg (from ankle to the ball of my heel), but I only pin the back of my legs (no seam is shown in the front). I then proceeded to cut the back of my leg bracer leaving extra seam allowance for the zipper. I then rip stitch my mock Davis jacket fur top and then cut it in half. Then I cut the fur (length wise) in the middle for both pieces giving me 4 pieces total. I then proceed to tacky glue the fur on the top of the leg bracer, let it dry for 5 minutes each lightly pressing down on the fur. Then I proceeded to check open spots and glue them down. Since the fur was sticking up, I use Got2bglue so it can stay down. I then cut, finish, iron and sew the four strips of Cream color fabric to each of the bracers. Then I cut two small brown pleather strips (1.5" width), sew on some Cream color cotton for the borders (.4" width), then added the buckle. I put the "mini belts" aside and cut two pieces of brown pleather triangles (enough to reach the ends of your bracers to the split between your big toe and medium toe). I then cut the actual "spaghetti" strap (that was part of the flip flop itself) and threw it away. I then sew the triangle piece to the bracer. Then I sew the "mini belts" to cover the seam between the bracer and the ends of the triangle piece. I then hot glue the triangle piece to the actual flip flop. Then I cut and sew the ends of the triangle piece to make my own spaghetti strap, then hot glue it to the shoes. I added the separating zipper in the back. Belt: So I started off measuring my waist, then I cut out two brown pleather strips (Your waist size x 1.5"). Sewn the brown pleather strips, wrong sides together, I had a double layer strap (so it felt like a actual belt). Then I took some left over Cream color cotton fabric, and sew a .5'' width border to each side (also it covers the seams from the double layer belt ^_~). Then I sew on some hooks, eyes and Velcro (to keep it close). The buckles were made out of 1/2" MDF wood, cut, sanded, sprayed painted and painted. Then I just hot glue the buckles to there respectable places on my belt. Toga (2 layers): (This was a dozy to make) I took a basic toga pattern, alter it a bit and made the top layer of the toga. Put it aside for later use. Creating my own pattern for the second layer, I then measure out the circumrence of my waist and the length from my waist to a little bit below my ankles to get my second layer. I found some red/gold/black ribbon at Hancock's fabric, but I used the wrong side of the ribbon to get that red/gold design (really hard to find a red/gold ribbon). Then I sew it to the second layer to get the border detail. I then pin/sew the top layer to the second layer (which was underneath the top layer). Thank you Son for being my Mannequin.
Add a Comment
-
 100532 VisitorsAce's Pick: 10/2015
 -
- Cosplayer Info
- Costumes Worn
- Costumes Made
- Props
- Wigs
- Favorites
- Convention History


Sorry, you must be a registered user of and logged in to view and add comments. Either log in or register now!