

ACParadise Network:
American Cosplay Paradise
American Cosplay Experience
American Cosplay Snapshots
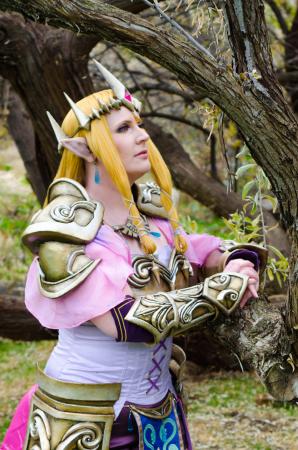
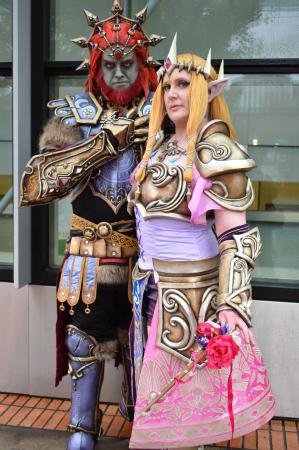
Cosplayer Seifer-sama > Costume of Princess Zelda (Legend of Zelda: Hyrule Warriors)
- Most Recent Photo
- 11-10-2018
- Series
- Legend of Zelda: Hyrule Warriors
- Character
- Princess Zelda
- Year Completed:
- 2018
- Construction Difficulty:
- Very Difficult
- Costume worn at:
- Kumoricon 2018

About this Costume
- Construction Details:
-
Cosplay Construction Notes:
n
nQueen Zelda - Hyrule Warriors
n
nCollaborating with EVZombie!
n
nThe Apron / Tabard:
nThis started as a base of a very bright blue satin fabric. I used heat n bond on all the other satin fabrics, cut them out, and heated them to the base blue fabric and a light chiffon fabric, which is what makes the gradient. Once everything was heated and in the right place I slowly appliqued all the pieces and then hemmed the edges.
n
nThe Armor:
nAll of the armor started out as paper test patterns I traced onto craft foam. I cut the foam out and then covered them in worbla and heated them into shape. The gauntlets, pauldrons, greaves, necklace, and crown have been covered in worbla and I've added the additional swirl details using rolled worbla scraps. Once those were done I smoothed them out with gesso and wood filler and painted all the armor I have completed. The painting process took hours for each piece, mainly because I had to mix my own colors for that pale gold Zelda has and because those swirls just take forever to detail!!
n
nBust Armor:
nI so procrastinated on this piece... it was literally the last thing I made for Zelda. I've only done armor like this a handful of times and it's just not my favorite. The boob cups are just worbla so I had more control over the shape and let's be honest.... they didn't need to be any bigger by adding foam. XD Everything else is the exact same as the other armor pieces.
n
nThe Gems:
nThe drop jewels are something I found on Etsy and once I had those in hand, I used it to match the color of the custom resin gems I made. I added a few extra crystals in a similar color to the drop beads because, well... I wanted to!
n
nThe Skirt:
nThis has been quite the project. All the designs were cut out, applied with heat n bond, and appliqued. I think overall it took me about two weeks worth of work. The main skirt is a pink and white taffeta with the gold crepe satin designs appliqued on. I used an additional pieces of taffeta for the lining and sprayed it with ColorTool for the gradient affect!
n
nThe Shoulder Ruffles:
nI found a light pale pink lining and used that along with the remaining gradient chiffon I had left over from the apron, hemmed the edges, and pleated it to give it a nice ruffled look.
n
nThe Gloves and Leggings:
nBoth were made out of a dark plum spandex. I stabilized the inside at the tips so I could do a gold satin stitch near the edge without it bunching too much.
n
nThe Corset:
nI've made "corsets" before but I don't feel that I ever actually made them the correct way. This time I was bound and determined to make it as right as possible. I used a sturdy cotton for the inner structure and sewed boning channels down every main seam. Since her character design doesn't necessarily look like the corset opens in the front I actually made a separating zipper for the back and kept the front closed. I should also note that those curved pieces were a pain to pattern and keep consistently even! Uhg!
n
nThe Shorts:
nSeriously easy. I found a summer shorts pattern online and modified the pattern to look more like Zelda's shorts. I used a stretch taffeta and therefore I didn't need to add a zipper. Hooray for pull on shorts!
n
nSO happy to finally have this monster project finally finished. - Personal Thoughts:
- A 4 year project finally finished! <3
Wig Details
- Wig Brand
- Arda Wigs
- Wig Name
- Le Tigre Long
- Original Color:
- Light Blonde
- Wig Quality Rating
- 5 / 5.00
Add a Comment
-
 353869 Visitors
 -
- Cosplayer Info
- Costumes Worn
- Costumes Made
- Props
- Wigs
- Favorites
- Videos
- Convention History


Sorry, you must be a registered user of and logged in to view and add comments. Either log in or register now!