

ACParadise Network:
American Cosplay Paradise
American Cosplay Experience
American Cosplay Snapshots
Cosplayer Melting Mirror > Costume of Kiryuin Ragyo (Kill la Kill)
- Most Recent Photo
- 11-16-2014
- Series
- Kill la Kill
- Character
- Kiryuin Ragyo
- Year Completed:
- 2014
- Construction Difficulty:
- Very Difficult

About this Costume
- Construction Details:
-
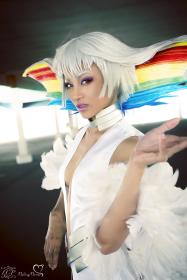
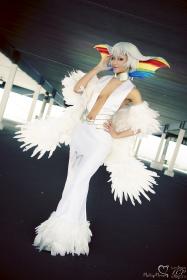
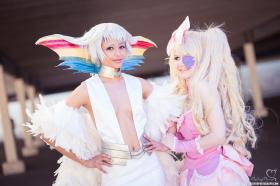
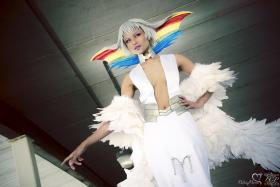
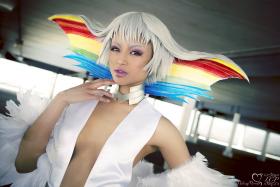
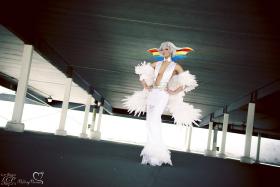
Dress: I used a matte white satin for the dress. I wanted something luxurious but not too shiny. I modified a fishtail/mermaid skirt pattern for the skirt and improvised the top. I added ruffled tulle at the bottom of the skirt to prop up the feathered trim which is removable by Velcro. The dress is entirely lined with white polyester.Coat: I made a base out of twill and stiffened it with heavy interfacing. I linned it with white polyester lining then added several layers of ruffled tulle to add some body to the shoulders and bottom layer. I then sewed down an insane amount of Velcro pieces to attach the feathered trim. I wanted it to be removable for easy transit since feathers are fragile. There is about 16 metres of goose feather trim on the coat.Since her coat is wide, I made removable extensions to her coat - also with velcro - so that I can have it ready for a photoshoot but removable when manoeuvring through crowds.Necklace: It is made of one layer of craft foam and one layer of styrene. The line detail is the result of cutting out a small piece of the styrene to expose the foam that was dark washed with black acrylic paint. It is attached in the back with Velcro.Belt: The inner layer is craftfoam, the outer is one layer of Worbla. The recessed lines were created by pressing in the worbla with a wooden knife. I added several layers of wood glue then finished it with silver spraypaint. I defined with lines by hand painting them black with acrylic. It attaches to the dress with Velcro. She has these weird floating beads on her outfit. I made mine out of Worbla and attached it to the belt with chains and lobster clasps.
I bought a long silver wig from Epic Cosplay as a base, in addition to 2 sets of long wefts. Left over white fibres from other wigs were custom dyed for all the rainbow colours using various techniques. From the top of the wig rainbow: FW ink, Hand-dyed Sharpie,
Idye poly dye, Dylon tin of dye, Tintex
The base of the wig is made of wonderflex then covered in felt for extra grip for attaching the wefts. I made the base curved because I wanted the wig to be easily photographed from multiple angles - not just head on. So there is a bump close to the ears that smooths out to the tips.
Applying the wefts: The base layer was glued down with clear silicone caulk. All subsequent layers were added using clear Elmers glue. I used about 2 bottles of caulk and 2 bottles of glue - which added some weight. The same technique was used in the back with the silver wefts.
The base with all the coloured wefts was attached to an understructure 'helmet' made of Kroblacast. I made a bare bones helmet - a 1 inch strip around the hairline and another from the centre of the forehead to the back. I added felt to cushion my ears as some weight pushed down on them. It supports most of the weight but it needs to be heavily pinned to keep in in place.
I removed most of the wefts from the back of the base wig and trimmed all excess off the sides by the ears. The long silver pieces that connect to the 'rainbow' were heavily covered in Got2Be freezing spray then covered in clear Elmers at the ends to glue them in place. - Personal Thoughts:
- My biggest wig challenge yet but it worked out somehow!
Add a Comment

-
 839615 VisitorsAcy's Pick: 09/2011
 -
- Cosplayer Info
- Costumes Worn
- Costumes Made
- Props
- Wigs
- Favorites
- Convention History


Sorry, you must be a registered user of and logged in to view and add comments. Either log in or register now!