

ACParadise Network:
American Cosplay Paradise
American Cosplay Experience
American Cosplay Snapshots
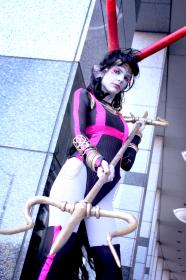
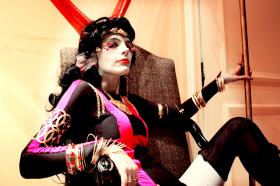
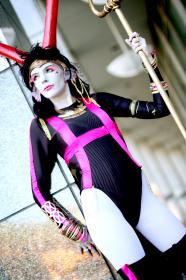
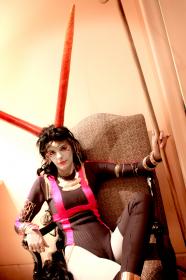
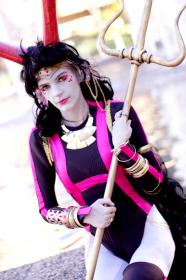
Cosplayer fabrickind > Costume of Her Imperious Condescension (MS Paint Adventures / Homestuck)
- Most Recent Photo
- 07-21-2014
- Series
- MS Paint Adventures / Homestuck
- Character
- Her Imperious Condescension
- Year Completed:
- 2013
- Construction Difficulty:
- Difficult
- Costume worn at:
- FanimeCon 2014
- FanimeCon 2013

About this Costume
- Construction Details:
-
This costume.
While my love of the character factored into my choice of this costume, I mostly chose this cosplay for the sheer challenge of it. It's a huge pain to wear (and I can't fit through doors or in some areas of buildings, as I'm over 8' tall in this!), so I can't wear it often, but it's a lot of fun.
Here's a bit of a breakdown of the elements:
Suit:
I used a 4-way stretch spacer neoprene fabric for the bodysuit, and patterned the suit myself. The fabric was surprisingly a dream to work with, though the cut edges are a bit itchy. (I zigzagged over the seam edges and then flatfelled them, which was not easy on tight areas like the sleeves -- I would recommend binding the edges in bias tape or french seaming if anyone wants to use this fabric for their own cosplays, or if I ever completely remake this.) The symbol is made of a spandex fabric and machine appliqued on. I will probably change the applique by the next time I wear this, since it is a bit too bright of a color (ah the perils of ordering fabric online!) and has a couple of small wrinkles in it (I'll probably hand sew it rather than machine sew it, as I had no issues with the handsewn applique on the sleeves wrinkling, and I'd have more control). It also tends to wrinkle where I bend, like at my waist, but there's nothing I can really do about that. ;]
The suit features decorative topstitching in metallic black thread (which works really well with the spacer fabric, as it creates large indentations), a high-cut legline, a crew neck, and long sleeves with pointed detailing at the wrist. It also had gold-colored chans looped across the hips and shoulders (well, they kept wanting to fall down...I'll probably tack them in place at the tops to prevent that from happening again).
The thigh-highs are made of the same materials as the suit itself.
Horns:
Those horns are a huge pain. Do not ever make horns this large.rnrnMy horns measure 27" from top to bottom, and made from carved 2" thick XPS foam ("pink" insulation foam -- the stuff in large sheets). I sealed the foam with wood filler/spackle, painted it with acrylic craft paint, and then sealed the paint with a spray-on gloss clearcoat. I used four colors of paint -- yellow, orange, bright red, and dark red.
The horns are attached to a thick plastic headband (I would guess 1.5~2" wide) with six screws -- one in the middle and two towards the sides of each horn. I drilled through the headband with a dremel and screwed the screws directly into to the foam of the horns, using my hands and a screwdriver. The middle screws are the longest at 8", and the outer screws are shorter, at 3". The long screws in the middle hold the horns on the headband and upright, and the shorter screws give added stability so the horns don't wiggle around. I'm going to have to reattach the screws, though, since the horns ended up going off at weird angles rather than straight up, like I wanted. (I'll also have to pad the bottom of my headband so that I don't bruise my head again! Don't wear metal screwheads with a significant amount of weight on them directly against your head, kids.)
The headband/horn combination is worn underneath my wig, and the wig has holes cut in the top to thread the horns through. This hides the headband, but makes my wig look weird, so I'll have to add in some wefts and sew down the cut ones in order to fix that. Since the horns like to slide forward on my head when worn alone, the weight of the wig (and the many wig clips that hold the wig in place), along with about 3~4 bobby pins keeps the horns in place. This is a fairly stable rig, though it needs a bit of improvement to make the horns just a little more stable and to protect my head.
Wig:
This is four wigs attached together, and will likely be more wigs in the future. I would like to add one more for length, and add a buncha wefts for more volume. As it is, the wig hits me at almost my ankles.
To get length, I used April's tutorial: http://sweetartsandhellacrafts.tumblr.com/post/11020785515/fefcestor-long-haired-wig-tutorial
I used a bunch of cheap curly wigs from eBay and Taobao for this. The lower three wigs are 100cm wigs, and the upper wig is 80cm. While the horns are relatively lightweight, the wig is fairly heavy. It wasn't a super difficult method of styling, but the wig itself is a bit cumbersome to wear (because of the weight and length) and to store.
Earfins:
These are made out of a wire armature with chiffon glued over the top. I then cut the edges of the chiffon into a suitable shape and painted it to the proper grey, with hints of fuchsia around the edges for interest and definition, and to seal the raw edge. (I think I may have melted the edge with a lighter as well?) I used chiffonbecause I had some laying aroundbecause I wanted the translucent look of an actual fish fin. Organza would have worked well, too, since it is slightly iridescent, but the texture might be off, so I'd have to experiment. They attach to my ears with a loop of wire on the backside that slips around the back of my ear, and stay on fairly well once the wig is on top. I added gold-colored earrings and chain to make them a little more fancy. It might be nice to make them a bit bigger so they don't get lost in my wig (this pair was originally made for my Meenah cosplay, so I didn't have to worry about that!), but I still always get compliments on them because most earfins are made of opaque materials, and mine are semi-transparent due to the sheer fabric used.
Tiara:
This is made of two layers of craft foam, using a Sailor Moon tiara tutorial I found online. After vectoring the shape of her tiara from the comic, mirroring the image to get both halves, and printing it out to create a paper pattern, I cut a smaller piece of thinner foam and glued it to a larger piece of thicker foam to create a sense of depth and a bit of a lip around the edge. I then painted the whole thing gold, added a bit of weathering, added a bit of hammered-looking texture with puffy paint (which I then painted a different shade of gold), and glued rhinestones around the edges and in the middle. Some of the rhinestones are painted over to give them a gold rivet look (adding more texture than color), and some are left plain.
The tiara attaches with a strip of wide black elastic that goes around the back of my head. This keeps it in place quite well. The elastic is worn over my horn headband (for added stability) and under my wig (to hide the elastic).
2x3dent:
I made this out of a 1"x6' wooden pole, a wire and foil armature, and paperclay. I wish that I had made the wire stronger by twisting multiple strands together (a thicker gauge would have been harder to work with -- I used 14 gauge galvanized utility wire -- so adding more wire or a thinner wire on top would have made it stronger), since the arms have a bit of wiggle, especially around where they attach to the base. The paperclay was not easy to shape into the trident arms, and it constantly wants to crack. I do repairs with Gorilla Glue, Gorilla Tape, thin utility wire where needed, and papier-mâché. I like the look of my 2x3dent, but it's a bit too fragile for my tastes.
The ring-shaped decorations are simply molded paperclay. The entire prop was sanded smooth and spraypainted gold, given a spray-on gloss coat, and weathered. I might add some jewels or something a bit fancier to it in the future, or if I ever remake it.
Makeup:
I use Kryolan Aquacolor for my troll paint. I used the color 32B in all the pictures you see here, and it is the best of their light greys for troll skin, I think. (089 is good but a bit blue, and 074 is a bit greenish/yellowish and looks strange, but might work for Captors through Maryams. I've tried all three, and find 32B to be the best overall.) My legs are covered in We Love Colors tights in light grey. The grey is very blue in person (I suspect that they sent me light blue instead of light grey, or that the dye batch was off, since I've seen other people, in person, with supposedly the same color tights and they aren't the same at all), and I'll probably replace them with a batter grey once I can find one. I did only a light coat of (well-sealed!!) grey on my hands, so that it wouldn't rub off on everything, though water-based paints tend to stay in place pretty well.
My eyelashes are from eBay, and a bit too warm of a pink. Can false eyelashes be colored with something, I wonder? The lipstick is Maybelline Color Sensational Vivids in Vivid Rose, and is also a bit too warm. (I've since replaced it with a Rimmel one that is a bit darker.) My eyeshadow is Ulta eyeshadow in Thrill Seeker. The gems are glued on my face with eyelash glue (in case anyone didn't know how to glue gems to their face?).
Jewelry, &c.:
I have so much of it. So much.
The necklace, larger cuff bracelet (supposed to be worn on my upper arm, but it kept falling off), most of the rings, and about half of the bangles came from Forever 21. If you need a lot of cheap gold-colored jewelry, go there, if you have one nearby. The rest of the bracelets are from misc. teen and tween girl shops in the mall. I attacked a lot of these with glue and fuchsia gems to add a bit of interest. The fuchsia cloisonne bracelet is from Target, as are the shoes. The earrings and anklets came from eBay. The thin wire bracelet on my upper arm is handmade out of twisted jewelry wire. The anklets are actually cuff bracelets that I have small enough ankles to barely be able to fit on there.
I wanted to keep the feel of her jewelry but not go 100% canon with it, since I wanted to add a lot more to make it seem more opulent. (Plus, her bracelets in the actual comic are really thick and stay on her arms in impossible ways, due to cartoon proportions!) I do wish I had more bracelets that fit on my upper arms, though. I guess it's time for another eBay spree!
Aaaaand I think that's about it. If you have any questions about how I did anything, feel free to PM me. :]
Add a Comment


 Upgrade Cosplayer
Sorry, you must be a registered user of and logged in to view and add comments. Either log in or register now!