

ACParadise Network:
American Cosplay Paradise
American Cosplay Experience
American Cosplay Snapshots
Cosplayer Zephyr Makes Things > Costume of Tira (Soul Calibur 4)
- Most Recent Photo
- 05-14-2014
- Series
- Soul Calibur 4
- Character
- Tira
- Special Variation:
- Player 1
- Year Completed:
- 2013
- Construction Difficulty:
- Difficult
- Awards
- Kawaii Kon 2013 Cosplay Showcase Best Master
- Costume worn at:
- Kawaii Kon 2013
This Costume has been retired

About this Costume
- Construction Details:
-
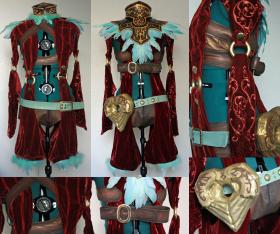
I drafted the patterns by a combination of masking tape on a dress form and draping muslin to get the proper shape for everything as there wasn't a pattern that I could use as a base.
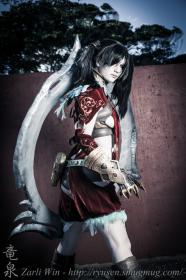
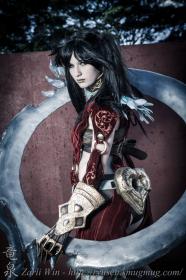
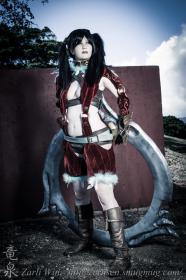
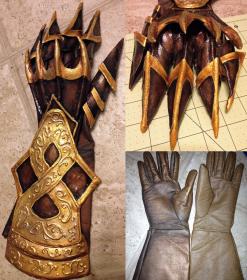
The jumper was constructed out a cinnamon coloured silk velvet that I used orange decolourant on to make the stripes. It is fully lined with a matching taffeta lining with velvet edges so the lining is hidden.The embroidery on the sleeves was drawn by me and embroidered with my computerized embroidery machine. The rings that connect the sleeves and the front of the jumper were drapery rings that I applied gold leaf to. The leather 'boob-holster', gloves, and leather bottoms were made out of faux leather that I distressed with cheap acrylic paint. There are snaps on the 'boob-holster', leather bottoms, and inner ling of the jumper to help keep everything in place and give that magical video game look that exists in the game.
I made the belt out of a seafoam green faux leather and added the studs and grommets on the front. The Heart buckle is affixed with heavy duty velcro.
The Heart buckle is made from a cardboard skeleton covered with spray foam that was carved into the proper shaped. It was then covered with paper mache. The painting process started with a layer of gold leaf Rub'n'Buff then the designs and distressing was done with cheap acrylics.
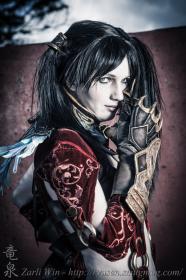
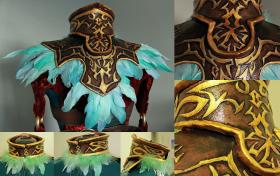
All of the armor was made with Worbla. Everything was painted with with the gold leaf and spanish copper Rub'n'buff to start but distressed heavily with the acrylics to give it more depth. The clear coat was three coats of Automotive gloss clear coat spray paint.
The feathers were a combination of a maribou boa, goose, and duck feathers that I custom dyed with Cushing's Natural Dye in jade green and turquoise green.
The boots were an old pair of knee-high biker boots that I added the faux leather of the pieces of the costume and the cinnamon coloured velvet. The boots were also distressed with acrylics.
The ringblade was constructed from a circular PVC pipe with a cardboard skeleton covered with spray foam. After 12+ hours of carving I covered it in masking tape before covering it in a layer of polyurethane. After the layers of polyurethane I applied the fiberglass. Following the fiberglass there was probably 40+ hours of sanding before I got to apply the body filler. I used a grey spray primer and a gunmetal and silver spray paint to paint that bad boy. I still need to add details but I ran out of time. - Personal Thoughts:
- This costume was a pain in the butt to put together, but I am really happy with how it turned out.
Wig Details
- Styling Notes
- I used about half of a package of short wefts in the same colour as the wig to add a back part so that you couldn't see the cap/skeleton. I styled the wig into its uneven pigtails and back braid before cutting the final shape of the pigtails. The hair ornament is made out of Worbla painted with a base of spanish copper and gold leaf Rub'n'Buff and details painted with cheap acrylics I bought at Wal*Mart. n There is a lot of hairspray in the pigtails to try and help keep the shape as well as a bit of teasing.
- Wig Review
- All in all I am pretty proud of how the wig turned out, especially as it is the first time that I had styled a wig.
Add a Comment
-
 253933 Visitors
 -
- Cosplayer Info
- Costumes Worn
- Costumes Made
- Props
- Wigs
- Favorites
- Videos
- Convention History


Sorry, you must be a registered user of and logged in to view and add comments. Either log in or register now!