

ACParadise Network:
American Cosplay Paradise
American Cosplay Experience
American Cosplay Snapshots
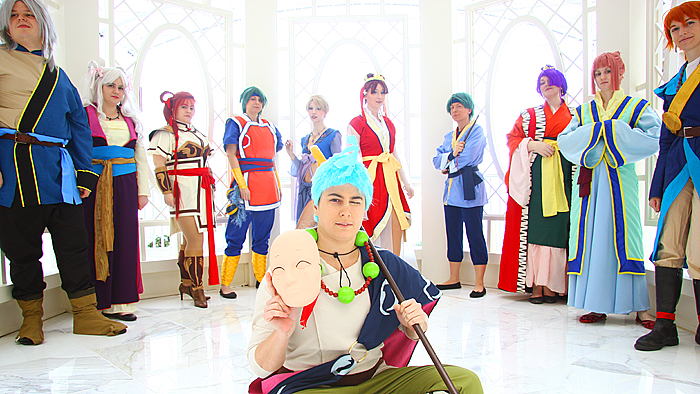
Cosplayer Ara-Chan > Costume of Chichiri (Fushigi Yuugi)
- Most Recent Photo
- 04-11-2012
- Series
- Fushigi Yuugi
- Character
- Chichiri
- Year Completed:
- N/A
- Construction Difficulty:
- N/A
- Awards
- Judge's Award @ AnimeNext 2011
- Costume worn at:
- Anime Boston 2011
- AnimeNEXT 2011
- Katsucon 2012
About this Costume
- Construction Details:
-
Necklace - Started with 2 inch styrofoam balls ( the smooth white ones) and painted with 3 layers of gesso, 3 layers of green acrylic and 3 layers of clear gloss varnish. They were sanded in between the gesso and acrylic layers. I had to make my own holes using a very long needle. The red beads are 14mm agate beads that were purchased of eBay. The whole thing was then strung onto 16 gauge jewelry wire so that it would hold it's shape and not droop like most necklaces. The red feather was then hot glued into place. Mask - Bought a primed and ready to paint mask from Joann's Fabric and painted with a few layers of flesh colored acrylic paint. The eyeholes were then closed by painting some paper and taping it to the back of the eyes. A sharpie marker was then used to add the upside down U eyes, eyebrows and the cheek lines. Shirt - Made from a linen blend and is a modified chinese dress pattern without the collar. I mad my own facing, lengthened the sleeves and modified the crossover. Closes with velcro. Pants - Also made from a linen. Started with a wide leg pant pattern and cut it of at the knee. Elastic waist. Bottom of the pants was hand crafted pattern to fit my calf then added to the pants. There is a small slit in the back if each leg by the ankle that comes apart with velcro so I can get my feet in and out of the pants. The black detailing is actually elastic. The top and bottom straight pieces are machine sewn while the criss-cross pattern was hand sewn on while wearing the pants. I believe the elastic would move with my legs more and not be so constricting. Belt - Basic belt = strip of fabric sewn into a tube, put right side out, iron and sew ends together *ta-da* Cape - TOOK FOREVER! Made up of a navy blue cotton blend, a very light blue linen and a pink kona cotton. Started with the navy rectangle and had to draft a pattern that allowed it to hang in a nice way instead of just looking like a blanket. Once that was done then I hand drafted the light blue pattern pieces. Each is a diameter of about 3 inches. Cut out about 15. Used steam-a-seam to apply them to the cape. Each circle was then satin stitched to give them a better look. After the top layer was done I then added the pink bottom layer. The gold ring holding it together is actually a bracelet I found at the dollar store. The top half is sewn to the ring while the bottom half has a snap so it can be taken off easily. 10+ hours on the cape alone. Hat and shoes were purchased either at a con or off eBay. Staff - Top is made of a combination of model magic and paper clay. Sealed with gesso, black base coat, 5 layers of gold acrylic and 3 layers of clear gloss varnish. The hanging rings are actually glow bracelets that were painted with the same technique. Top ornament sits in a 1/2" pvc coupling that sits on a 4' wooden dowel. Dowel was painted with a brown gloss. There is a felt tip on the bottom of the staff so it doesn't scrape the floor. I am planning on replacing the bottom part to make it taller. I just ran out of time to find something.
Wig Details
- Styling Notes
- Wig was cut as short as possible without making it too thin to give the buzzcut look. A thin extension was then looped through and secured at the bottom of the wig. The crazy bangs are made of 2 pieces of craft foam sandwiched together and then covered with some of the extension. There are small wires inside a couple of the spikes to help shape it. The bangs are removeable for easy storage and travel. A wire is looped through the front of the wig and attatched to a piece of craft foam underneath to hold it in place. The bangs easily slide onto it.
Add a Comment


 Upgrade Cosplayer
Sorry, you must be a registered user of and logged in to view and add comments. Either log in or register now!