

ACParadise Network:
American Cosplay Paradise
American Cosplay Experience
American Cosplay Snapshots
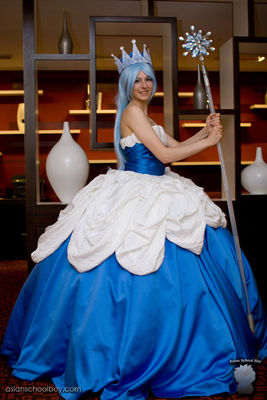
Cosplayer gbright1 > Costume of Queen Frostine (Candyland)
- Most Recent Photo
- 08-12-2010
- Series
- Candyland
- Character
- Queen Frostine
- Year Completed:
- N/A
- Construction Difficulty:
- N/A
- Costume worn at:
- FanimeCon 2010
- Otakon 2011
About this Costume
- Construction Details:
-
This cosplay was a special new challenge for me. I stated with just an idea. I was going to lay down a simple blue skirt over a hoop skirt with a pillow top for the frosting, however then I saw how flat this looked from the few other’s that had done the costume. I wanted mine to have dimension and accuracy. The first step was to make the dress larger than the hoop skirt. The first idea I had was to get a larger hoop skirt, however the nice people of ebay told me the steal would bend and curl if it was any larger. Not sure if that is true but I decided to abandon the large hoop skirt idea. Instead I took about 70 yards of tulle and made a giant petticoat from it. In the back of my mind I kept hearing the project runway crew say “don’t over design it.” So I decided to make the frosting really special and leave the blue skirt simple but with plenty of fabric to move. The white frosting on top of the skirt was the hardest design challenge ever. I didn’t really know what I wanted at first. I knew I wanted it to be special and I got the idea of making it into pieces and having more dimension for it from season 5 winner of project runway. Her “petal” look really inspired me but I couldn’t use the tuck under technique she used for the finale’s wedding dress challenge since the bottom on my pieces needed to be round. I spent a month manipulating 5 yards of muslin, making and remaking pieces that could possibly work. Finally, I made this small tucked under piece right before Christmas. I liked how it looked like frosting on home made cakes. It was perfect, but I needed a lighter weight fabric than I had for the dress. So after purchasing 10 more yards of white fabric and 5/6 yards of interfacing to give the backs some stability I was ready to sew them. The first thoughts I had on the top were along the lines of a corset. However the harsh lines created by ribbing did not fit the feel of the dress. Instead I looked through a book of wedding dresses and stated to have this idea of folds pulled across the bust line. It went through a few other idea of making the top fancier but they would have been covered by the frosting and looked odd, so once again I went with one idea, which I think fit the look of the folded frosting on the bottom. Headwear was a totally new challenge for me as well. I had attempted a pirate hat previously which ended in disaster. I looked through the tiaras on ebay but felt that this character was a queen and needed a crown not a tiara. My first thoughts were to make it completely clear as in one of the renditions of the character. However after assembling that it was clearly(ha ha) not plausible as it was hardly seeable. I tried painting the back of the clear crown with stain glass window paint however it still didn’t have the smoothness and look I wanted. It looked like a kindergartener made it. I decided to depart from the literal look of the picture and opted for a more realistic crown look keeping the elements of the game board design. The crown still had half orbs adorning the top, a backing, and solid points. I decided to give the points a frosted look with some sugar looking glitter. The final touch was getting it to attach to the wig with out falling off, but still having it detachable. Magnets. ^^ The staff I had a little help with. The top is a Christmas tree star which I took the lights off of. 60V power supply = no lighting up for me. I added some foam glittered oval into the center for more accuracy, but would like to work on the over all size of the top. The staff was made into 3 part for transportation, and has EL wire in it to light up a bit. Phew… so there it is.
Add a Comment


 Upgrade Cosplayer
Sorry, you must be a registered user of and logged in to view and add comments. Either log in or register now!