

ACParadise Network:
American Cosplay Paradise
American Cosplay Experience
American Cosplay Snapshots
Cosplayer Ion > Costume of Crescendo (Eternal Sonata)
- Most Recent Photo
- 02-12-2012
- Series
- Eternal Sonata
- Character
- Crescendo
- Year Completed:
- N/A
- Construction Difficulty:
- Difficult
- Awards
- Honorable Mention (Katsucon 2010), 1st Place (UBCon 2011)
- Costume worn at:
- AnimeNEXT 2010
- Katsucon 2012
- Katsucon 2010

About this Costume
- Construction Details:
-
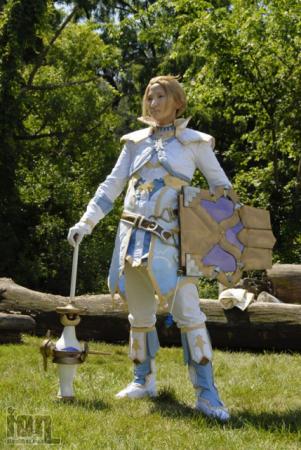
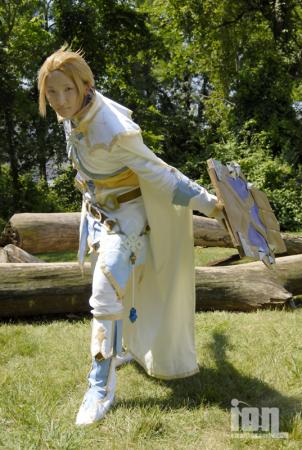
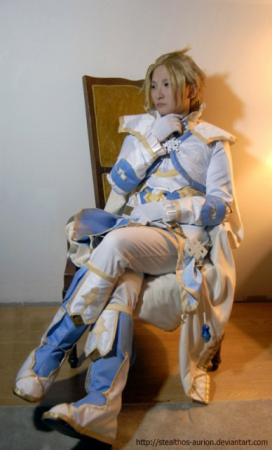
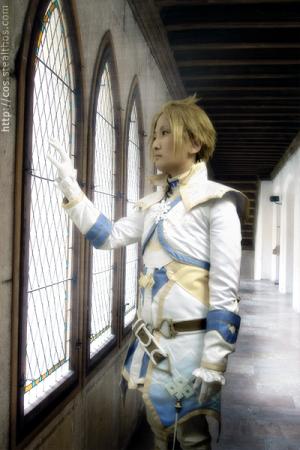
Namco designs on their own + Yoshioka design = bias tape and pieces of flair. Those were the themes of this costume.
1.) Figuring out how to achieve the ombré dyeing effect on the "skirt" pieces was easier said than done. As the costume is made from bridal satin, obviously the dye was not sticking to the fabric as planned. I didn't get fiber reactive dye this time. After a few tries, I resorted to actually using watered down Jacquard fabric paint. After 20+ coats to get the colors the dark enough, the fabric was a little stiff, but I didn't need to use interfacing on those pieces so it worked out well.
2. Unorthodox lining: I wanted the bridal satin to have a little structure so I opted for taffeta. It gives the garment more shape despite how much I hate working with taffeta.
3. Lovely appliqués from satin on the skirt pieces. Ridiculous, time-consuming, but I didn't trust heat n' bond and thought appliqué would look nicer. And it is nice indeed.
4. No Tales of Bias tape love, I couldn't find anything pre-packaged that I wanted from material I liked or in the width I needed. So I used gold fiesta satin and made my own double-fold bias tape and mitred the crap out of it, that's how I got the nice edges and points.
5. Embroidery: This was my first stab at embroidering. I don't have a special embroidery machine so I just did tight zig zag stitches on my machine using metallic gold thread. The detailing came out surprisingly well for a first try. I was very pleased with the results despite the fact that the thread kept snapping.
6. The belt: The belt is a vinyl casing I put over nylon webbing. That is indeed white bias tape for trim. The buckles I made from wood. The weird belt bling thing is made from wood, sculpey, and vinyl tubing.
7. Mace of power: This was actually the first piece I worked on. Usually I save props for last. The basic shapes were created from sanding down styrofoam and covering them with Model Magic. After wet sanding things smooth and assembling the pieces, I primed/taped off/and painted everything. Despite thinking foam for the core pieces would be light, this prop somehow ended up weighing around 10 lbs.
8. Shield: Made using foamboard. It's not the best idea ever, but it worked for a "stand in" until I can go back and make a proper shield from better materials.
Hey, it did survive 2 days of cosplay wear and tear at Katsucon this year.
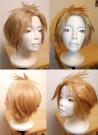
9. Wig: As you may notice, I have 2 wigs kickin around. The longer one I wore at Katsucon wasn't for this costume at all. It was my Link wig. I didn't have time to finish Crescendo's wig before Katsu, but it is now complete and appropriately styled. This wig resembles his hairstyle much more. This is a good thing!
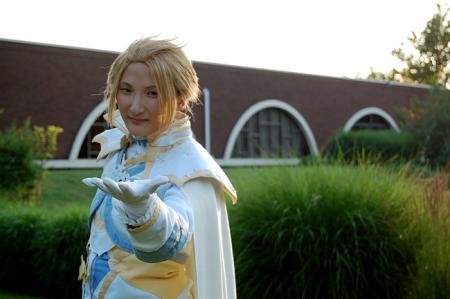
10. CAPE! This is the latest piece to be completed. At first I didn't want the cape, but since he wears it throughout the game, just not when battling, I figured it should be made. It's cotton sateen with metallic gold trim at the bottom and gold braiding for the arches. Gold charms adorn each arch. Doubled cotton sateen is heavy, just so you know.
Wig Details
- Styling Notes
- Wig 1: This wig was chin length, I used clippers to shorten it to "boy length" and added some wefts in the front to give more body to his... strange comb-back deal with the bangs. 12/2011: Wig 2: Now using a Nirvana Michelle wig in the 24/613 color. I custom dyed it to be a deep sandy blonde color since it arrive and was a much more platinum blonde shade than what was pictured. I trimmed the length all around and added a fake lace front to the very center to imitate the natural hairline.
Add a Comment


-
 342261 Visitors
 -
- Cosplayer Info
- Costumes Worn
- Costumes Made
- Props
- Wigs
- Items for Sale
- Favorites
- Convention History


Sorry, you must be a registered user of and logged in to view and add comments. Either log in or register now!