

ACParadise Network:
American Cosplay Paradise
American Cosplay Experience
American Cosplay Snapshots
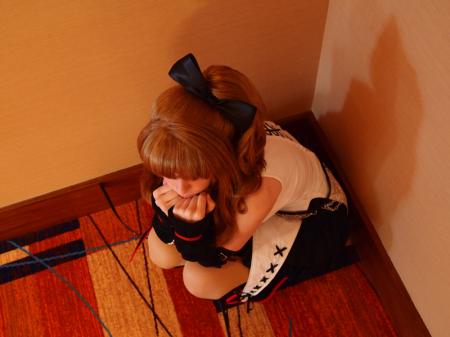
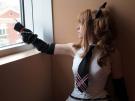
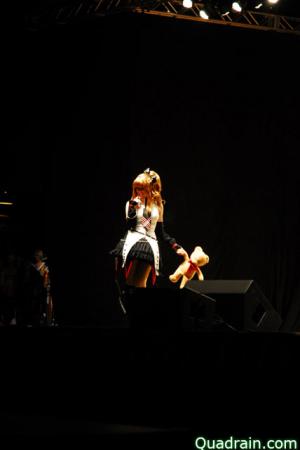
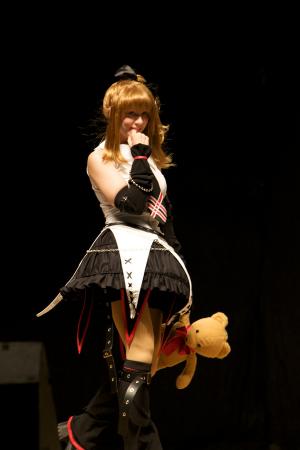
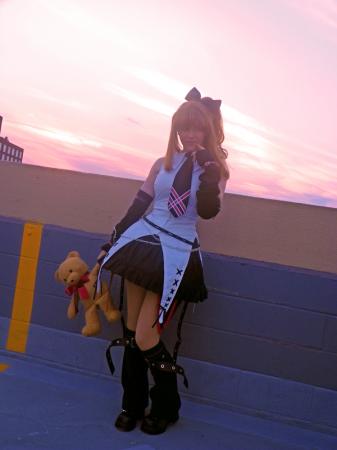
Cosplayer Starlightslk > Costume of Mikuru Asahina (Melancholy of Haruhi Suzumiya)
- Most Recent Photo
- 08-13-2012
- Series
- Melancholy of Haruhi Suzumiya
- Character
- Mikuru Asahina
- Special Variation:
- Goth-Punk Lolita
- Year Completed:
- 2010
- Construction Difficulty:
- Very Difficult
- Costume worn at:
- Dragon*Con 2011
- Katsucon 2011
- Otakon 2010
About this Costume
- Construction Details:
-
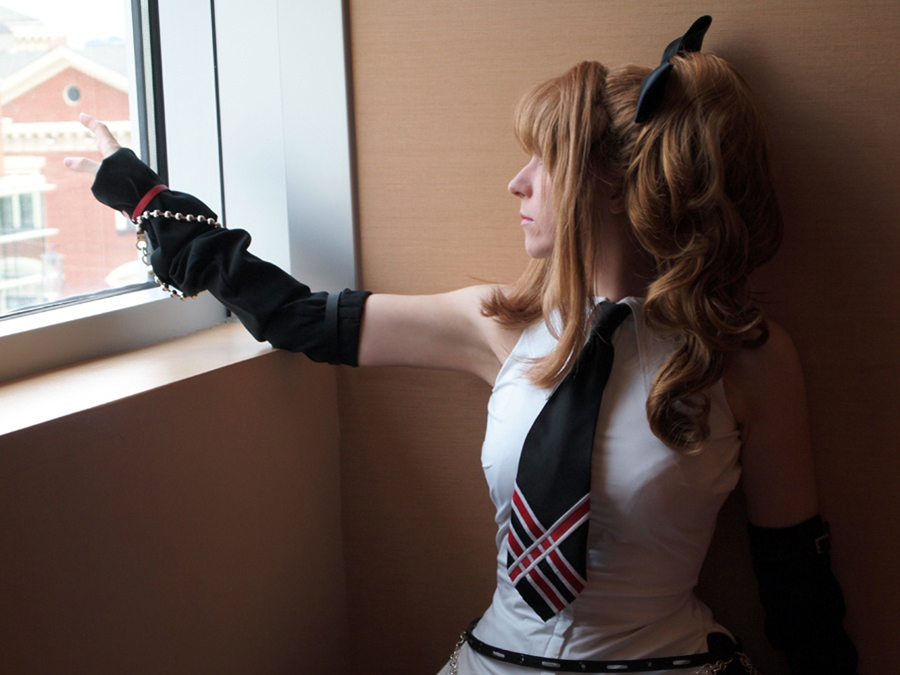
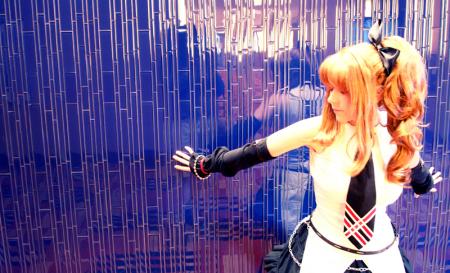
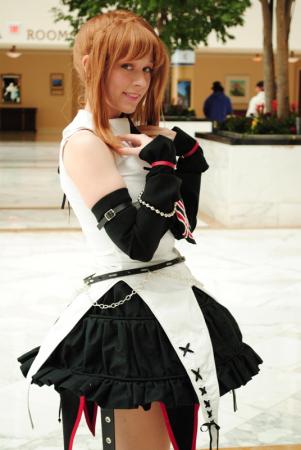
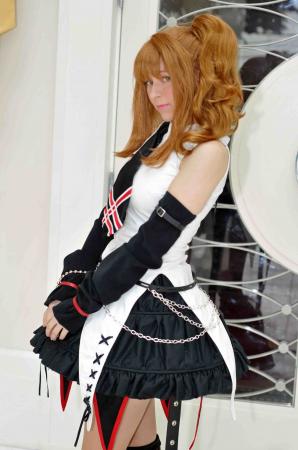
♥~Shirt~♥
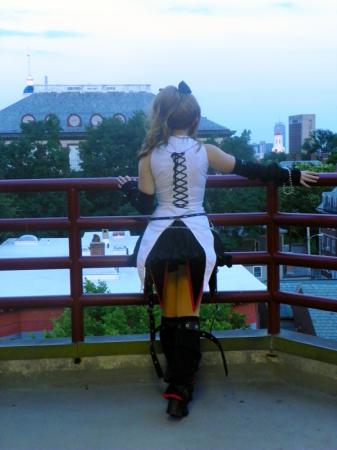
This was a very daunting piece, it's made from shirting, and I had to create a pattern that fit me and then add tails to it, while accounting for the pin-tucks to allow for the lacing down the back.
There is piping along the entire bottom edge, and it has a zipper and snap closure combination since such a tight-fitting shirt would not stay properly shut with buttons or snaps alone and there are no visible buttons in the art. The entire shirt is lined and then top-stitched.
The front lacing are double-faced black satin ribbon that run through white grommets. The back lacing is the same ribbon (I used the entire spool on this cosplay) but there it runs through over 20 mini hand-sewn on "D" rings that ends at the collar in a bow ♥. The collar is specially drafted and draped for the proper look.
♥~Skirt~♥
There is 9 yards of twill fabric in this little bugger. I made the pattern with my measurements & lots of math! XD I hand gathered ever single little gather and ruffle, my hands hurt for a while after...^^; The piping is custom made to mach the skirt and was sealed to the proper circumference before attaching to the skirt. It has an elastic waist with a draw-string to ensure that it stays in place. There is metal hooping installed in it to help maintain proper shape.
This piece was very deceptively time consuming, and I actually ended-up making a second bottom ruffle since the first was not ruffly enough. XD
♥~Arm-warmers~♥
Made from stretch moleskin (it was so buttery and draped beautifully ♥.♥ but I've never been able to find it again ;_;) Probably the simplest pieces since they are just really long tubes, measured to the width of my upper arm and then just multiplied the length of my arm several times for the length. Some elastic, french seams, rolled hems and some little tricks later they were done. ^.^
♥~Leg-Warmers~♥
These were a little more difficult than the arm-warmers because they have more details but are made from the same stretch moleskin fabric. Again I drafted the pattern with my measurements and more math. XD
The red detailing on them is red piping and red bias tape respectively. The bias tape seals the bottom hem and all other seams are frenched because this material liked to fray terribly which was frustrating when working on them. -_- The ribbon with bow that connects around the ankle is a beautiful double-faced satin and I assembled a pre-tied bow that has a hidden hook since it's too small to get up around the foot if it were connected. This in conjunction with some elastic hold the leg-warmers up in place around the ankle.
♥~Tie~♥
Since I have no clue how to tie a tie I made my own clip-on tie based off a cheep child's clip-on I found, but I made my own larger for a more adult size. Making it a clip-on also made more sense than making one that needed to be tied each time because I needed to be able to embroider on the red cross design on the tie knot, which was made much easier by making it a clip-on.
It's made from a black matte satin with red matte satin appliques that have been secured down with white satin stitching (which I had to do in little batches because it makes my eyes hurt if I was looking at it that long). The tie keeper is hand sewn on since it was impossible to machine on properly. It has black lining that is hand-stitched in. The red cross on the knot of the tie is hand-embroidered on.
♥~Bloomers~♥
Another of the few simpler pieces, and they were made out of a simple cotton and 3 pieces of elastic. I think they only took about 3 hours to make and are rather comfy...(I did wear them around our room a lot at Otakon 2010 since they were comfy and a ton more modest while getting ready than just tights since this cosplay has a very specific dressing order XDDD hehe)
♥~Petticoat~♥
I couldn't find a proper length petticoat to go under my triangles skirt, they were all too long or made for tiny children so the waist wouldn't fit, so I had to resign myself to making it from scratch. ;_; It's made from chiffon, and was a giant pain in the arse. All edges are fray-checked and french-seamed and some are even flat-felt seamed, depending on which seams they are just so it wouldn't fray apart as chiffon loves to (since I do not own a serger nor do I have access to one.) -_-;
All the inner seams that connect each tier of the petticoat together are encased in ribbon and secured in place, and I hand-sewed on velvet ribbon trim and a little bow so I would know which was the outside and front of the petticoat...I know no one will ever actually see this but it makes me happy knowing it's there since I initially entertained the notion of making the skirt out of velvet, but through my research discovered that was not a very suitable fabric for goth-punk lolita styles. XD
It took about 40+ hours to make the blasted thing and a ton of ribbon trim (about 16 yards of the stuff just for the bottom tier @@) I love how cute and poofy it came out it give just the right amount of fluff to poof out the triangle underskirt*.*
♥~Triangle Underskirt~♥
Made from faux-suede and bias tape, black grommets and loops that attach them to the belt that goes under the main skirt. The hardest part of this was getting them to be so pointy and hide the tip-seam but that only took some trial and error to finally be happy with.
♥~Leg Belts & Dangling Under the Skirt Belts~♥
All made from real leather belting with nickle grommets, nickle ez-rivets (the name lies, I went through a bunch and had a difficult time getting them to set right), and nickle buckles. It took a lot of working, care, and attentiveness (and some rather nasty cuts to my hands) to get right. It took about a month or so of my free time to figure out and achieve the look I wanted. I had to color soften, scrape, cut, warp, and bend the leather to my will. It was quite the learning experience but I am rather pleased with the results. ^-^
♥~Waist Belt~♥
Was pretty fun to since I had figured out the techniques I needed with the previous belts. I used black grommets and 2 different punches to create the holes in the belt and then silver chain and rather large jump-rings to drape the chain which was super fun to do. I based it off the figure and it's as close to 1 to 1 as maybe. XD I was even able to make the leather belt part virtually seamless just like the figure which made me really happy (all I'll say about it is that it involved a tin can ;P). It took about a week of hard work during my free-time to complete this belt, which was nice considering some of the other parts. XD
♥~Upper Arm Belts~♥
I think these were amongst the simplest of the belts. Just took a lot of thinning of the leather so they looked right in the tiny buckles. Then just dying treating and sealing them. I do want to say that I really love my leather punch, even-tho it doesn't always love me back XP
♥~Red Wrist Bracelets~♥
Thinner leather same idea as above but much less work and the tiniest leather punch for the hole. Toughest part was matching it to all the other red in the cosplay. (Yes, all the reds do actually match which is something else that makes me really happy ^-^ same with all the buckle styles, which was lucky I found them in all the sizes I needed in matching style ^.^/)
♥~Silver Metal Ball-Chain Bracelet~♥
Made from a wallet waist-chain that I cut down and used the attachments it came with, plus a nickle ring to attach the two sides together.
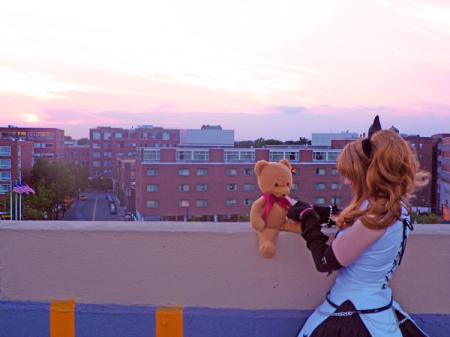
♥~Teddy~♥
See Here for Teddy :D
♥~Shoes~♥
Most comfy cosplay shoes ever! Finding the perfect shoes is what made me seriously start to work on this cosplay, tho I had wanted to make it ever since I saw the picture and the figure...it was just way too cute not to! ^.^ - Personal Thoughts:
- After the beginning of season 2 of Haruhi I wanted to make another Mikuru cosplay because I love cosplaying her but was unsure if I should continue with my idea of the Battle Waitress or to go with something less cosplayed. When I saw the Punk Lolita outfit for Mikuru (esp the Griffon Enterprises figure, sculpted by Masahiro Yamamoto) I immediately fell in love with the design, it was just so adorable, and started entertaining the notion of making this cosplay. It wasn't before long that I just couldn't resist and I was set on making it....^^;
Plus, I was looking for a simpler cosplay that all the others on my plate at the time to dabble at in between the difficult ones....boy was I mistaken in picking this one for that purpose...XD This is one of those cosplays where it looked simple and easy to create but was totally misleading...^^; I worked on this cosplay for about a year from the purchase of the initial materials to it's completion and debut.
Wig Details
- Styling Notes
- This is actually 2½ full wigs. I had to dismantle one entire wig (Angela 750), since the wig I chose for the proper color did not have matching wefts or loose hair available. I had to sew all the wefts into my base wig (Tanya) so I would be able to pull it up into the base for the ponytail without wefts showing and I also had to add some wefts to the side-bangs so that those would be the proper fullness.
The ponytail was an additional piece added on once the wig was pulled into the ponytail base and stubbed. There are 4 wig clips and some combs that I sewed into the inside that help to keep it in place since it is a very heavy unbalanced wig, that has all its weight on one side. It took about 3-4 weeks of my free-time to hand sew in all the wefts to assemble this wig and style it. The bangs were heat styled so they remain soft but still hold their shape. The bow was definitely the easiest part for this piece, since all I had to do was make a pre-tied bow with no tails.
Add a Comment


Sorry, you must be a registered user of and logged in to view and add comments. Either log in or register now!