

ACParadise Network:
American Cosplay Paradise
American Cosplay Experience
American Cosplay Snapshots
Cosplayer fabrickind > Costume of Juri Arisugawa (Revolutionary Girl Utena)
- Most Recent Photo
- 01-07-2016
- Series
- Revolutionary Girl Utena
- Character
- Juri Arisugawa
- Year Completed:
- 2016
- Construction Difficulty:
- Normal
- Costume worn at:
- Sac-Anime Winter 2016

About this Costume
- Construction Details:
-
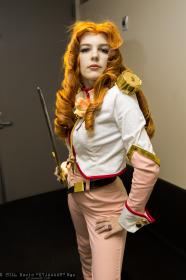
This costume is all about the tailoring!
Pants: Made out of a poly crepe. It searched high and low for one that would work, and I'm really glad I found this one, since it's the perfect color, texture, and weight. These are very stylish high-waisted, pleated pants with sharp creases down the front.
Jacket: Made of a white bottomweight sateen, and trimmed in red bottomweight sateen bias tape. Gold parts are gold pleather trim (leftover from my Pearl cosplay), either appliqued on top (the armband) or reverse appliqued underneath (the triangles at the collar).
The cuffs are functional, and the front of the jacket closes with hooks and eyes. I didn't want the risk having a visible zipper, and hooks seem to be canon, but it's a pain to do them all up, since I alternated the directions of them to prevent them from popping open (aka "pulling a Touga").
The epaulets are craft foam either painted gold or covered in the same gold pleather. They snap onto the jacket for easy removal.
Rope is something I found in the home dec section of the fabric store. It attaches with a loop of embroidery thread to a hook on the underside of the right epaulet, and threads through a loop made of the same crepe as the pants and armband at bust level in the front. "Hardware" on this consists of painted wooden beads, a small piece of gold pleather, and polymer clay (for the pyramid doohickey at the end).
Jacket is entirely faced, and will be entirely lined once I get the welt pocket in.
Locket:
I bought a cheap gold locket off of eBay and sculpted the rose out of polymer clay, and painted it gold. Yes, it has a picture of Shiori inside.
Sword: Made of foamboard, balsa wood, craft foam, and a wooden dowel. I drew and traced all the filigree by hand, and cut it out of craft foam. - Personal Thoughts:
- I got into Utena really late -- the summer of 2015 -- and fell in love with the series immediately. While not my favorite character (that would be Anthy), Juri is certainly waifu status. I chose to cosplay her because she embodies my type (elegant badasses) and I really love her character. This costume was a lot of fun to make and wear, and I found a lot of other RGU fans!
Wig Details
- Styling Notes
- The wig was a huge pain to style, and it is very heavy, but those curls aren't going anywhere. I used clear silicone caulking to get the curls to stay in place. I wanted the large curls that she has in-show, but I didn't want the stiff look of typical drill curls (I also wnted a denser look, as opposed to the amount of space typical drill curls have between the curls), so I opted for this method. I carefully separated the wig into section (8 total -- two bang pieces, two forelocks, and 4 large curls in the back), and carefully detangled each section before styling. Using gloves, I squirt some of the caulking into my hand and rubbed it into the wig, mostly focusing on the backside and the very tips, but making sure that the front had enough caulking to keep it smooth. I then took the hair and wound it around a cylindrical object (wooden dowels of two different sizes for the smaller front pieces, and an empty gift wrap tube for the larger back pieces), being sure to pay attention to the direction her hair curls in canon (since each half of her head curls in an opposite direction). I then squirt the caulking directly on top of the curls and smoothed it by hand, being sure to move in the direction of the hair. I had to wind the curls pretty tight to get them to stay while the silicone cured (but hey, tightly wound is Juri's M.O.), and often had to tape the ends down to prevent them from uncurling before it dried. I then hit them with a small blast of Got2Be freezing spray. Once these cured, I carefully removed the curls from the cylinder (this is important, since they tend to stick a little -- I messed up one of the curls a bit by trying too lard to unstick it) and tacked the curls together with a bit of orange thread where the weight of them was causing them to separate and pull downward. This was only needed in a few locations per curl, and really kept them together. I got a lot of compliments on the wig when I wore it, and everyone I talked to was amazed at how soft and springy the curls remained, even though they were tightly controlled. I had more than one person ask me how I managed to get curls so large to stay in place!
Add a Comment


 Upgrade Cosplayer
Sorry, you must be a registered user of and logged in to view and add comments. Either log in or register now!